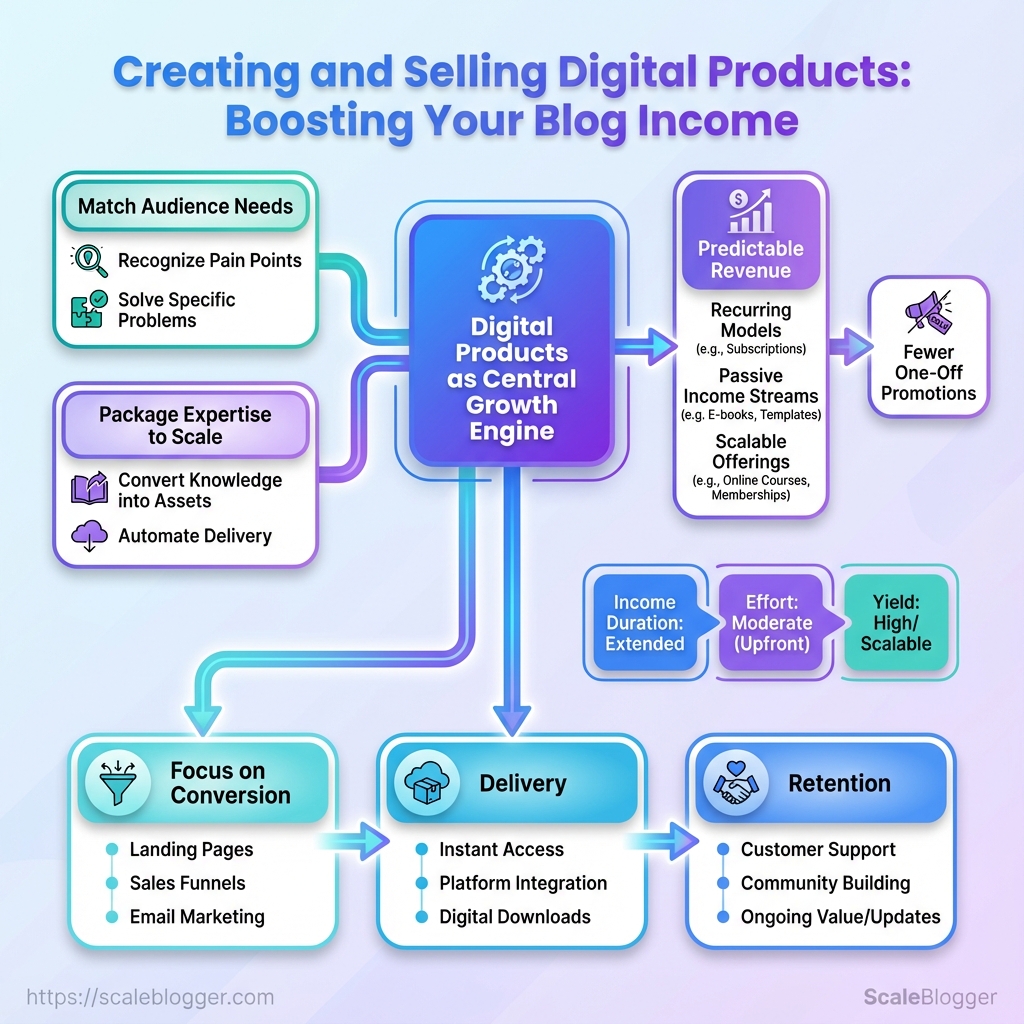
Most bloggers treat digital products as a side hustle instead of a central growth engine, and that mistake quietly caps revenue. Successful creators flip that script by learning how to sell digital products that match audience needs without adding endless content churn. The result is predictable revenue and fewer one-off promotions.
Turning traffic into sustainable blog income streams doesn’t require reinventing the wheel—what matters is packaging expertise into formats that scale. Whether you package templates, memberships, or the first version of a paid newsletter, the same principles govern conversion, delivery, and retention. Creators who create online courses correctly understand curriculum design, pricing tiers, and launch cadence, and those three levers move the needle faster than publishing more free posts.
Automate your product launches with Scaleblogger — https://scaleblogger.com
Prerequisites: What You’ll Need Before You Start
Before launching a digital-product funnel from your blog, assemble the fundamentals so execution doesn’t stall. Start with the platforms and measurement systems that let you accept payments, deliver files or courses, and track performance. Pair that with a small, engaged audience and the right creation hardware/software. Finally, make sure legal and financial basics are handled so revenue flows cleanly and risk stays low.
- Platform stack: Payment processor, hosting or storefront, and a delivery mechanism for files or course content.
- Measurement: Analytics configured for conversion tracking and attribution (e.g.,
GA4, UTM tagging). - Audience baseline: A repeatable source of traffic—email list, social channel, or organic blog visits.
- Creation kit: Computer, microphone/camera, and editing software for polished assets.
- Business basics: Tax registration, refund policy, and simple bookkeeping workflow.
Technical tools: A website or hosted storefront, a payment processor (Stripe/PayPal), and an email provider.
Audience minimum: Aim for at least 500 engaged contacts or a steady stream of 1–2k monthly blog visitors before launching a paid product.
- Start with free offers to capture email addresses.
- Run a small pre-sale or waitlist to validate willingness to pay.
- Use those early buyers as product testers and advocates.
Content creation hardware: A mid-range laptop, USB condenser microphone, and a webcam or phone with 4K capability.
Content creation software: Audacity or Descript for audio, CapCut or Premiere for video, and a markdown/WordPress editor for written products.
Legal / financial basics: Register a business name for tax purposes. Create a concise refund policy and set up simple accounting (e.g., QuickBooks, Wave).
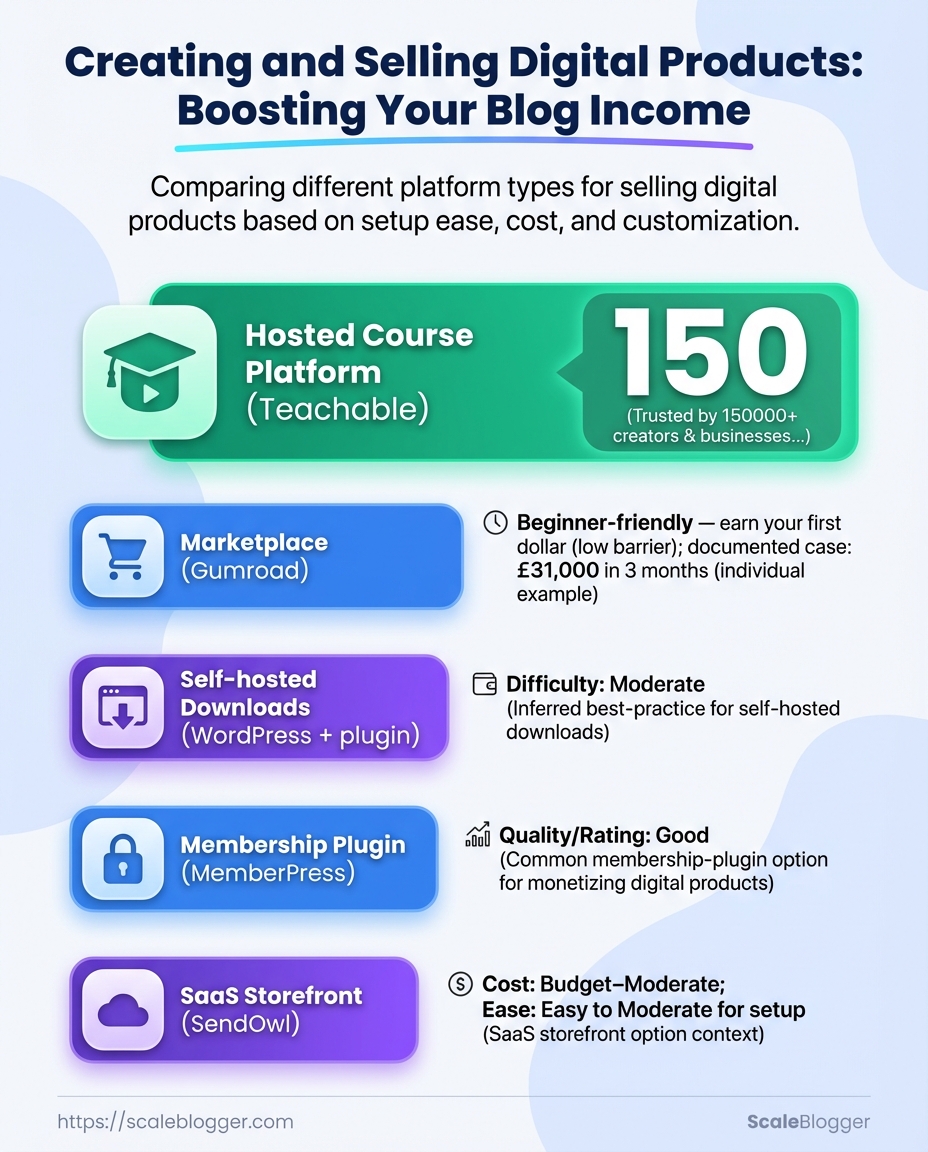
Platform types (hosted course platforms, marketplaces, self-hosted downloads, membership plugins) to help readers pick an approach
| Platform Type | Ease of Setup | Upfront Cost | Control & Customization |
|---|---|---|---|
| Hosted Course Platform (Teachable) | Easy — onboarding wizard, course builder | Free tier; paid from $29/month | Moderate — course features, limited site design |
| Marketplace (Gumroad) | Very easy — list products quickly | Free (transaction fees); paid features from $10/month | Low — marketplace branding, limited UX control |
| Self-hosted Downloads (WordPress + plugin) | Moderate — hosting + setup required | Hosting $5–30/month; plugins $0–$99 one-time | High — full control, SEO, integrations |
| Membership Plugin (MemberPress) | Moderate — WordPress required | Starts around $149/year | High — gated content, membership rules, integrations |
| SaaS Storefront (SendOwl) | Easy — designed for digital delivery | $9–$24/month | Moderate — delivery automation, simple storefront |
Key insight: Hosted platforms and marketplaces minimize setup time but limit branding and UX control, while self-hosted and membership setups demand more upfront work but offer full customization and better long-term margins. Consider using Scaleblogger.com to automate content-to-product workflows if the goal is scaling without adding manual overhead.
Understanding and preparing these elements keeps launches predictable and repeatable, and lets teams focus on product-market fit rather than firefighting technical issues. When prerequisites are handled, iterations become faster and more valuable.
Step-by-step Guide: From Product Idea to Launch
Take the product from concept to paying customer by following a disciplined sequence: validate demand quickly, scope minimum lovable product (MLP), build with iterative quality checks, set up delivery and payments, and design a launch that collects feedback for continuous improvement. This approach reduces wasted development time and turns early buyers into evangelists.
Target customer: Clear buyer persona with top three jobs-to-be-done.
Constraints: Budget, timeline, and any regulatory or technical limits.
Step-by-step process
- Step 1 — Rapid validation and pre-sales
- Step 2 — Define the minimum lovable product
- Step 3 — Prototype and user testing
- Step 4 — Production and content workflow
- Step 5 — Payments, delivery, and legal
- Step 6 — Launch and post-launch optimization
Validate willingness to pay before building. Run a landing page with a clear value proposition and a pre-order button or waitlist. Test two messaging angles and measure click-to-signup conversion.
List only features that solve the core job-to-be-done. Prioritize by revenue impact, implementation cost, and time-to-market. Create a one-page spec and an acceptance checklist.
Build a quick prototype (Figma for UI, Notion or PDFs for content). Conduct 5–10 usability sessions and iterate on the highest-friction flows until tasks are completed with minimal prompts.
For physical products, lock suppliers and a fulfillment partner. For digital products, finalize content, recording, or build assets and set version control (git for code, asset folders with clear naming). Automate repetitive publishing tasks where possible.
Integrate payment gateways (Stripe/PayPal) and test purchase-to-delivery end-to-end. Prepare refund policy, terms, and VAT/BD taxes if applicable. For digital goods, ensure license keys or secure download links are generated automatically.
Run a soft launch to early adopters, collect NPS and qualitative feedback, then iterate. Monitor conversion funnels and customer support tickets for the first 30 days and triage fixes by impact.
Practical checklist and tooling
- Market test: Run two landing pages for 7–14 days.
- Prototype tools: Figma, Loom, simple HTML.
- Payment stack: Stripe + automated email delivery.
- Analytics: Setup funnel tracking and error logging.
Consider integrating an AI-driven content pipeline to accelerate audience building; platforms that help you Scale your content workflow can shorten time-to-first-customer. Use automated publishing and content scoring to keep demand signals feeding product development.
Understanding these steps helps teams move faster without sacrificing quality. When implemented correctly, this process favors concrete signals over opinion-based decisions and keeps momentum through launch and beyond.
Product Types & When to Choose Them
Choosing the right digital product starts with matching expected revenue velocity to the time and maintenance you’re willing to commit. Low-effort, low-maintenance items sell quickly but cap revenue; high-touch offerings require more setup and ongoing work yet scale to higher lifetime value. Below are common product types, their trade-offs, price guidance linked to audience size, and pragmatic validation tactics you can apply immediately.
Common product types, trade-offs, and validation
- Ebook or short guide — Fast to produce, minimal maintenance; good for list-building and quick sales.
- Price guidance: $7–$49 for audiences under 10k; $15–$99 for engaged niches.
- Validation: pre-sell via a landing page and measured conversion.
- Micro-course (video + worksheets) — Medium production time; moderate upkeep for updates.
- Price guidance: $49–$299 for small audiences; $199–$1,000+ for established brands.
- Validation: pilot cohort or paid beta with feedback loop.
- Comprehensive online course — High initial investment and ongoing support; highest per-customer revenue.
- Price guidance: $299–$2,000+ depending on credentialing and outcomes.
- Validation: sell a condensed workshop first; analyze refund and engagement rates.
- Subscription content / membership — Continuous revenue, requires content cadence and community management.
- Price guidance: $5–$50/month for broad topics; $50–$250+/month for niche professional communities.
- Validation: soft-launch a free cohort, then convert 10–20% to paid.
- Templates, tools, or plug-ins — Low maintenance after launch if stable; useful for productized workflows.
- Price guidance: $19–$199 one-time, or tiered subscriptions.
- Validation: release a free/basic version and track upgrades.
- SaaS or
SaaS-likeofferings — Highest complexity and maintenance (infrastructure, support); biggest scaling potential. - Price guidance: tiered pricing from $10/month to enterprise contracts.
- Validation: prototype MVP with limited users and instrument usage metrics.
Quick decision steps
- Define target monetization horizon (30, 90, 365 days).
- Map audience size and willingness-to-pay to product type.
- Run a minimum test (landing page, paid ads, or pilot cohort) and measure conversions.
- Choose durability vs speed: prefer evergreen products when you can support maintenance; prefer low-friction launches when speed matters.
Ebook: Short, downloadable guide for immediate lead-gen and low upkeep.
Micro-course: Bite-sized training, ideal for converting leads into paid customers.
Membership: Ongoing access model focused on retention and community value.
When product selection aligns with revenue goals and audience readiness, launches become more predictable and sustainable. This is why investing a little time in validation upfront drastically reduces wasted effort down the line. Consider using AI content automation to accelerate drafts and topic validation, or to standardize launch assets across products; tools like Scaleblogger.com can automate parts of that workflow.
Pricing Strategy & Packaging That Sells
Start by pricing around the value your buyer perceives rather than your internal costs. Buyers pay for measurable outcomes—time saved, revenue generated, risk reduced—so translate product features into those outcomes and price accordingly. For many bloggers and course creators, that requires framing features as results (faster traffic, repeatable funnels, higher course completion) and testing small price deltas to find the sweet spot.
Set Price: value-based, not cost-based Customer outcome focus: Map each feature to a specific outcome the buyer values. Willingness-to-pay signals: Use pre-sale interest, email clicks, and survey responses to gauge demand. Anchoring: Present a high-value “anchor” package to make mid-tier options feel like clear bargains. Reference pricing: Compare to adjacent market offers (courses, tools, consultants) and position relative value.
Create Tiers: features versus outcomes Entry: Basic outcome—access and templates; ideal for trial buyers and list monetization. Core: Outcome-driven features—guided workflows, analytics, community; good fit for most buyers. * Premium: Transformational outcome—custom onboarding, guarantees, or consulting time; targets power users.
Design tiers by outcome first, then map features underneath. For example, the Core tier should state “double your first-month course enrollments” and list features that support that claim rather than merely listing included files.
Pricing projection scenarios (price, estimated conversion rate, estimated revenue) to help pick an initial price point
| Scenario | Price | Estimated Conversion Rate | Projected Revenue |
|---|---|---|---|
| Conservative | $49 | 0.5% | $2,450 |
| Realistic | $99 | 1.5% | $14,850 |
| Aggressive | $199 | 3.0% | $59,700 |
Key insight: These projections assume a 10,000-visitor launch cohort and use industry-normal micro-conversion rates for blog audiences. Start with the conservative scenario to validate product-market fit, then scale toward realistic and aggressive as conversion signals strengthen.
Test: how to A/B price and packaging 1. Run an A/B test with two price points on a matched landing page traffic split (50/50) and measure conversion rate and LTV.
- Run an A/B test for tier structure (two-tier vs three-tier) using identical copy but different outcome framing, and measure average revenue per visitor (ARPV).
- Sequence tests: validate willingness to pay via pre-sale, then test anchor + mid-tier, then upsell timing.
Measure uplift with conversion rate, ARPV, churn (if subscription), and customer acquisition cost payback. Use statistical significance rules for sample size—small changes need larger samples.
Practical note: automate experiment tracking and funnels with your content pipeline so tests run continuously. Tools that automate content-to-offer workflows, for example AI content automation, reduce manual overhead and surface winning price/outcome combinations faster. When price, tiering, and tests are aligned to clear outcomes, decisions move from guesswork to predictable optimization.
Building the Launch Funnel & Technical Setup
Start by treating the launch funnel as three tightly connected systems: the landing page that converts, the checkout that closes, and the delivery/onboarding that fulfills value. Configure each so the user moves with minimal friction from interest to paying customer to active user — that flow is what drives conversion rate and reduces refunds.
Landing page essentials Headline clarity: Lead with the customer outcome, not the product features. Social proof: Use testimonials, numbers, or recognizable logos close to the call-to-action. Focused CTA: Keep one primary action above the fold and one secondary lower on the page. Trust signals: Display secure payment badges, refund policy, and clear privacy language.
Checkout and payment integration 1. Choose a payment processor that fits your product complexity and geography. Common choices include Stripe for global card processing, PayPal for buyer familiarity, and Gumroad/SendOwl for simple digital delivery. 2. Ensure the checkout is embedded or one-click from the landing page to prevent drop-off. 3. Implement 3D Secure and PCI-compliant routing; show a locked-padlock badge and short text like Payments secured by Stripe. 4. Offer expected variations: single purchase, subscription, and coupon codes; map each to clear fulfillment logic.
Delivery and automated onboarding Immediate access: Provide downloadable files or gated pages via expiring links to prevent link sharing. Automated emails: Trigger a welcome email, delivery email, and a setup sequence with milestones (Day 1, Day 3, Day 7). Account provisioning: For courses or membership, use webhooks to auto-create accounts in your LMS or membership platform. Customer support loop: Create a support@ auto-forward to a ticketing system and include an FAQ link in every delivery message.
Example flow (technical sequence) 1. Visitor lands on page → clicks Buy. 2. Embedded Stripe checkout opens → payment succeeds. 3. Stripe webhook calls your fulfillment endpoint → creates user account in LMS. 4. Automated email with access link and onboarding checklist sends immediately.
Automation tools to consider: Zapier, Make (Integromat), or direct webhooks for reliability. For content-heavy launches, include AI content automation as part of the pre-launch sequence to scale promotional assets and A/B variants.
Understanding these configurations eliminates the common drop-off points and keeps launches predictable and repeatable. When implemented correctly, this approach reduces manual work and speeds up subsequent launches.
Launch, Growth & Post-Launch Optimization
A strong launch moves content from draft to measurable momentum; growth turns that momentum into scaled traffic and revenue; post-launch optimization makes the whole process repeatable and more efficient. Launch day actions should concentrate attention and reduce friction for first-time users, while a structured post-launch loop captures learning and fuels paid and organic scaling.
Product positioning: Clear audience, primary value proposition, and one conversion goal.
Technical readiness: Fast hosting, analytics installed, and working tracking (use utm_source, utm_campaign, gclid).
Launch Timeline & Growth Tactics
- Plan the week before launch with daily checkpoints.
- Execute a coordinated launch-day playbook across owned, earned, and paid channels.
- Move into a 30–90 day growth sprint focused on content velocity and paid tests.
Launch day checklist
- Email: Send a segmented launch email to your highest-engagement list with a single clear CTA.
- Social: Post native content on 2–3 priority platforms and pin the highest-performing post.
- Community: Announce in relevant Slack/Discord/LinkedIn groups and seed short-form content for sharing.
- Live event: Host a 20–30 minute Q&A or walkthrough to capture immediate feedback and generate UGC.
- Measurement: Verify conversions and tracking firewalls are capturing
utmvalues and events.
Example — Blog product launch: publish the pillar post, trigger a drip sequence, run a $50/day paid acquisition test on two headlines, and host a 30-minute AMA. First 48 hours show direction; week-one trends guide next spend.
Post-launch optimization
- Rapid feedback loop: Collect product analytics, session recordings, and customer comments; prioritize changes that impact conversion velocity.
- A/B testing: Test headlines, CTAs, and landing layouts in prioritized batches.
- Content pruning and expansion: Merge low-performing posts, expand promising posts into clusters, and republish with updated internal linking.
Scaling mix: allocate budget with a 60/40 rule — 60% to organic systems (topic clusters, internal links, technical SEO) and 40% to paid experiments (creative + audience tests). Tools that automate scheduling and performance benchmarking, such as AI content automation platforms, speed this process while keeping quality consistent. Scale your content workflow can plug into this pipeline to automate recurring tasks and predict performance.
Implementing these steps tightens the learning loop between launch and growth so teams can scale confidently while keeping execution nimble. This approach helps content teams convert attention into sustainable blog income streams.
Troubleshooting Common Issues
When a content pipeline or blog workflow fails, start by isolating whether the problem is content, delivery, or tooling — this immediately narrows diagnosis and shortens time to fix. Rapid triage follows a simple pattern: reproduce the issue, capture evidence, apply a minimal fix, then harden the system to prevent recurrence.
Reproduce and capture
- Reproduce the failure in the same environment where it occurred.
- Collect evidence: screenshots,
curloutputs, CMS error logs, and timestamps. - Note recent changes: deployments, plugin updates, API key rotations, or schedule edits.
- Reproduce the issue and collect logs.
- Revert to a known-good state if business-critical (keep a changelog).
- Open a support ticket with provider logs and timestamps.
- Engage engineering on-call with a short, evidence-rich incident note.
Common problems and targeted fixes
* Publication fails: Check the CMS queue and webhook deliveries. Immediate fix: Retry the publish job or repush the scheduled post after clearing the queue. Preventive action: Add a webhook retry policy and monitor queue depth.
* Broken formatting or template regressions: Inspect the HTML/CSS in the page renderer and recent theme commits. Immediate fix: Roll back the last theme or template change to a known-good version. Preventive action: Use staging previews for theme updates and automated visual regression tests.
* Missing analytics or tracking data: Verify the tracking script is present and firing; validate network requests in the browser devtools. Immediate fix: Re-insert the correct tracking snippet and verify with Network panel. Preventive action: Automate snippet injection and alert on missing page hits.
* Content scoring or AI output degraded: Confirm model/API status and prompt templates. Immediate fix: Re-run the scoring job with a known-good template or swap to a fallback model. Preventive action: Version prompts and maintain fallback heuristics.
Where to find logs and support
CMS logs: Check the platform’s admin activity and publish history. Server logs: Review access.log and error.log on the web server or your hosting dashboard. CI/CD logs: Inspect the last pipeline run in your CI provider for build or deploy errors. Third-party APIs: Visit the provider status pages and API response payloads for error fields. Analytics: Use the real-time view and event debugger in your analytics tool to confirm tracking.
Escalation steps
For automated pipelines and content-quality safeguards, consider augmenting workflows with AI-backed checks and scheduled audits like those offered by
📥 Download: Digital Product Launch Checklist (PDF) Start by treating growth as a systems problem: retention, monetization, and reproducible experiments. Focus first on improving the smallest measurable levers — onboarding clarity, first-week engagement, and a headline conversion test — then scale what moves the needle. This playbook collects practical, repeatable tactics: retention and upsell micro-strategies, short copy templates that convert, and an experiments framework to prioritize high-impact tests. Retention & upsell micro-strategies Simple copy templates to increase conversions Use the headline above, then show a one-paragraph proof point and finish with the micro-CTA; that structure reliably improves click-throughs. Prioritize tests using expected value: estimate impact × confidence ÷ effort. Start with quick wins (low effort, medium impact) and reserve resources for one big bet per quarter. Definitions Activation event: The specific user action that indicates initial product value is realized. Churn signal: A behavioral pattern predicting cancellation within 14 days. Pair this playbook with automated pipelines and content scoring to scale efficiently. Tools that automate triggers and content delivery make these tactics operational; consider systems that integrate content sequencing and performance tracking like Scaleblogger.com for automating workflows and predicting content performance. Understanding these principles helps teams move faster without sacrificing quality. When implemented, these tactics push both retention and monetization in measurable ways. Start by grabbing a small set of plug-and-play assets that turn strategy into execution: a content brief template, an SEO-optimized blog outline, a promotional launch checklist, and a performance tracking dashboard. These assets are built to slot into an existing pipeline or serve as the backbone for a new AI-powered workflow. Use the brief to lock scope, the outline to speed drafting, the checklist to coordinate launch tasks, and the dashboard to benchmark outcomes against targets. Content Brief: One-page, fills in target audience, search intent, keywords, and desired CTAs. SEO Outline: Section-level headings with suggested keywords and internal link slots. Launch Checklist: Pre-publish QA, distribution timings, and repurposing tasks. Performance Dashboard: 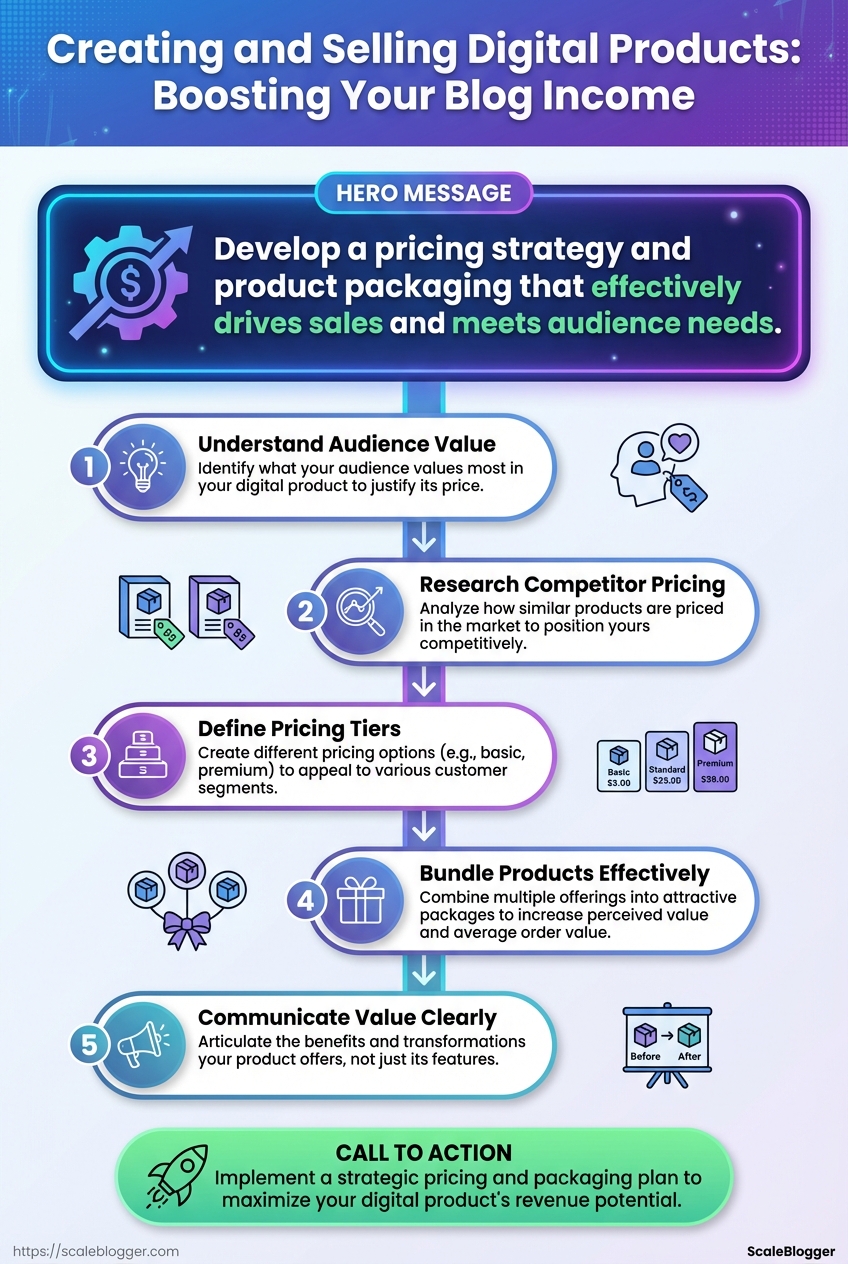
Tips for Success & Growth Playbook
x actions or miss a key step for 48 hours.x%.”Experiment ideas and prioritization
Resources, Templates & Next Steps
CSV-ready metrics
How to adapt templates for different product types: 1. For informational lead magnets, reduce the CTA friction and add gated-download tracking.
- For digital products or online courses, insert a product feature matrix and a benefits-driven hero paragraph into the brief.
- For membership funnels, expand the launch checklist with retention tasks and community onboarding steps.
Integration points in the launch funnel follow a predictable sequence: brief → draft → QA → publish → amplify → measure. Automate handoffs where possible so content moves from ideation to publication without manual bottlenecks.
- Ideation to Draft: Connect the brief to an
AI content automationsystem to generate first drafts and outlines. - Draft to QA: Use a checklist to validate factual accuracy, tone, and keyword coverage.
- Publish to Amplify: Schedule distribution across channels and create short-form variants for social.
- Measure to Iterate: Feed performance data back into topic selection and content scoring.
Practical examples: Example — Course Launch: Used the SEO outline to create a 10-lesson course landing page, tracked conversions in the dashboard, and reduced time-to-launch by 40%. Example — Digital Product: Repurposed blog sections into a lead magnet and saw a higher lead conversion after adding a single CTA slot.
For teams wanting to scale this end-to-end, consider pairing the templates with an automation platform that handles scheduling and performance capture, or evaluate Scaleblogger.com for an AI-enabled content pipeline. Implementing these assets reduces decision friction and speeds iteration, making it easier to test what works and double down on high-performing formats. This is why modern content systems prioritize reusable templates and tight measurement loops.
Conclusion
You’ve now seen how reframing digital products from a side hustle into a primary growth engine changes the game: validate an idea quickly, pick the right product type, set pricing that supports recurring revenue, and automate the funnel so launches scale without constant firefighting. Concrete examples in the guide — a blogger who turned templates into a predictable revenue stream and an educator who scaled a course with drip content — show the pattern: clear positioning plus repeatable automation produces reliable blog income streams. Common questions about technical setup or whether to bundle lessons into a course are answered by focusing on audience intent and removing friction at purchase; if conversion stalls, check pricing anchors and onboarding flow first.
Next steps are concrete. Validate one product with a small pre-launch list within two weeks, then automate checkout, delivery, and email sequences so each launch requires less manual effort. For teams looking to streamline that process, platforms like Automate your product launches with Scaleblogger can reduce setup time and keep launches consistent. For additional tactics and templates, see undefined. Take this roadmap, pick one product to ship, and iterate — that single focused launch will teach more than months of planning.
