If a tool can write a decent post but still leaves you copy-pasting into WordPress, it is only half useful.
The real pain is not writing a first draft; it is getting that draft into the editor, shaped correctly, and ready to publish without turning your workflow into a mess.
That is why the best AI tools that publish to WordPress do more than generate text.
They connect content creation to a real publishing path, often through the WordPress REST API, which supports authenticated post creation and updates through endpoints like /wp/v2/posts.
That connection is what separates a clever demo from something you can actually rely on.
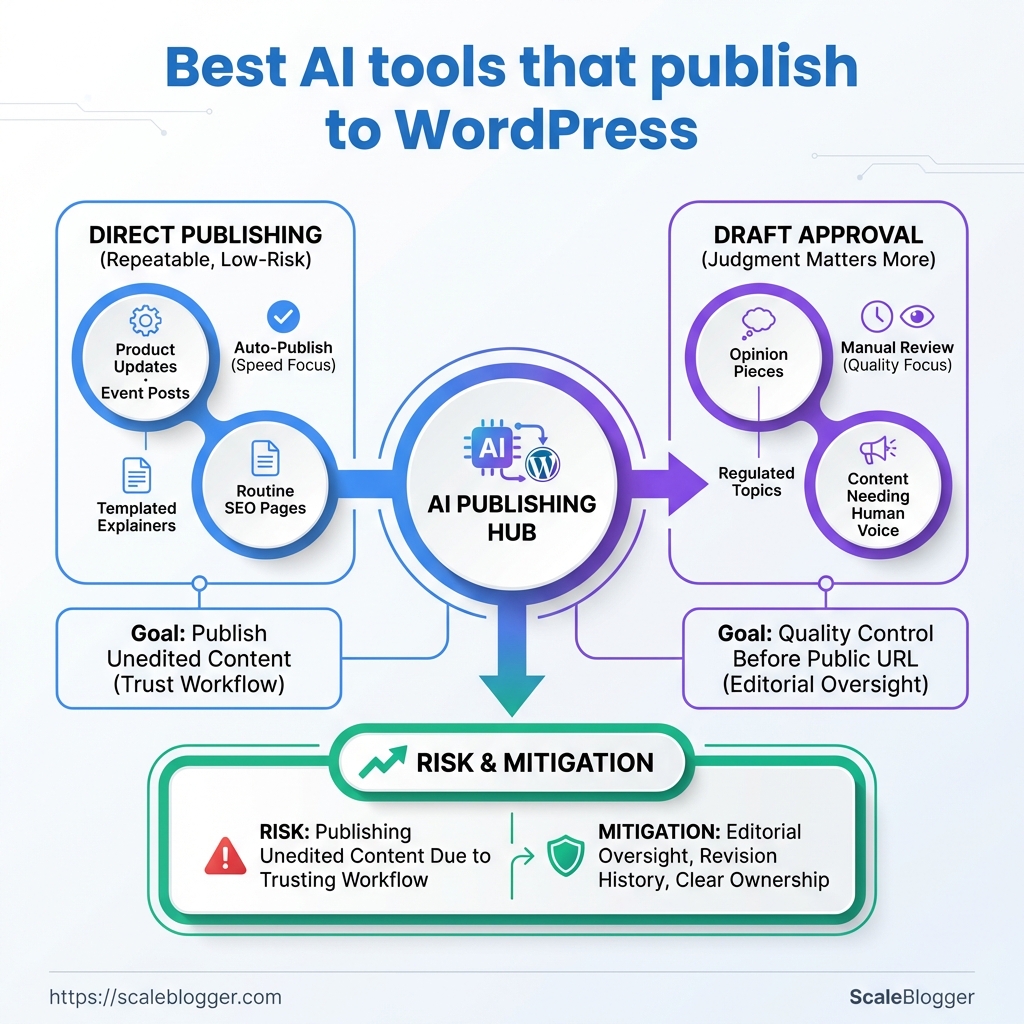
The tricky part is control.
Some workflows generate a draft first, then wait for approval, while others push content straight to a published post.
The safest setups keep a review gate in place, especially when tone, keywords, and formatting need to stay consistent across many posts.
There is also a practical difference between AI inside WordPress and AI that works outside it, then sends content in automatically.
Both can be useful, but they solve different problems, and the right choice depends on how much speed you want versus how much oversight you need.
Why choose AI tools that publish directly to WordPress?
Publishing straight into WordPress cuts out a messy middle step.
Instead of generating copy in one place, copying it into another, and fixing formatting by hand, the content moves through one clean workflow.
That matters when volume starts climbing.
A team that posts weekly can absorb extra clicks and reviews; a team publishing daily feels every bit of friction, especially when titles, categories, excerpts, and featured images all need to land correctly.
Tools like ScaleBlogger fit this pattern well because the draft, scheduling, and publishing steps live in the same pipeline.
The real win is not speed for its own sake.
It is fewer handoffs, fewer mistakes, and a much easier way to keep content moving.
When direct publishing makes sense
Direct publishing works best when the structure is repeatable.
Think product updates, location pages, simple news posts, or SEO articles that follow a stable format.
It is also the right move when you already trust the workflow.
Zapier and Make.com can pass AI-generated text into WordPress through the REST API, while Jetpack AI Assistant keeps drafting inside the editor itself.
That gives you options, from fully automated post creation to a calmer draft-first setup.
- Routine content: Best for posts that follow the same template every time.
- Fast-moving calendars: Useful when scheduling matters more than manual copy-paste work.
- Multi-step workflows: Helpful when AI output needs tagging, formatting, or conditional routing before publication.
Where the risk sits
Direct publishing gets risky when brand voice is fragile or the topic is sensitive.
A weak prompt can produce polished nonsense, and WordPress will happily publish it if the workflow allows it.
That is why draft-only steps still matter.
A review gate, minimum-quality checks, and a clear approval step keep the machine from outrunning the editor.
A safer publishing pattern
- Generate a draft first.
- Check the content against rules.
- Send only approved posts live.
- Keep rollback simple.
Direct publishing is worth it when the workflow is controlled, not chaotic.
The best setups make publishing feel boring, and that is exactly the point.
How we evaluated AI publishing tools
A tool that can write content is not the same as one that can survive a real publishing workflow.
The difference shows up the moment a draft has to move through the WordPress REST API, pick up the right SEO fields, and land on a schedule without mangling the post.
The easiest way to spot a solid tool is to test the whole path, not just the writing step.
That means checking whether it can create drafts through /wp/v2/posts, respect editorial controls, and keep the metadata clean enough for reporting later.
What we scored first
API publishing: We checked whether the tool could create or update posts through WordPress, not just copy text into a box.
Editorial controls: Draft mode, approval steps, and the ability to stop an automatic publish mattered more than flashy writing output.
SEO hooks: Title fields, meta descriptions, slug control, headings, and internal-link handling all needed to be editable before publish.
Scheduling: A good tool had to support delayed publishing cleanly, with no timezone surprises or missed post times.
Analytics support: We looked for a workflow that left room to track published-post performance after launch, even if the tool itself was not the analytics layer.
How we tested for repeatability
We used a simple setup: one test WordPress site, a limited admin account, and the same article brief across each workflow.
That kept the comparison fair.
Then we ran the same content through three paths: a Zapier-style AI-to-WordPress flow, a Make.com scenario with branching logic, and a WordPress-native draft workflow like Jetpack AI Assistant.
Each path got the same basic checks.
- Can it create a draft reliably?
- Can it preserve structure?
- Can it pass a review gate?
The roadblocks that showed up most often
Permission issues were the first snag.
WordPress publishing usually needs proper credentials, and self-hosted setups often rely on application passwords or similar authentication methods.
Field mapping was the next headache.
AI tools can produce good text, then drop it into the wrong place if the post title, body, and excerpt fields are not mapped carefully.
Scheduling bugs were less common, but more annoying.
Time zones and delayed actions can make a post appear late, which is a bad joke for anyone running a launch calendar.
The tools that passed this test were the ones that behaved like a publishing system, not a text generator.
That is the standard worth using.
Top AI tools that publish to WordPress — quick FAQ for each
Jasper-like tools usually sit closer to the editing experience than the publishing system.
That matters, because many teams do not want another full automation layer when the real need is tighter control over draft quality, titles, and post status.
The safest pattern in 2026 is still simple: generate content, send it to WordPress through the REST API, and keep a review step before anything goes live.
That setup fits Zapier, Make.com, and custom workflows, but the trade-offs change depending on how much control you need.
Jasper and Jasper-like tools
Jasper-style tools are best when editors want cleaner drafting, not a black-box autoposter.
They work well for teams that care about approval flow, because the content can stay in draft mode until someone checks the title, body, and tags.
This screenshot would show the usual handoff points: title field, content body, tags, and publish status.
It is the part people miss when they assume “AI publishing” means fully automatic publishing.
Can it publish to WordPress? Usually yes, but the stronger use case is controlled publishing, not blind posting.
Where does it fit best? Editorial teams that want AI-assisted drafting inside a managed workflow.
Writesonic and LongShot-style tools
These tools tend to be stronger on templates, scheduling, and SEO-friendly output than on deep editorial control.
They suit teams that want repeatable article formats and a quicker path from prompt to publish-ready draft.
Do they help with scheduling? Often yes, especially when paired with WordPress actions or an automation layer.
What makes them useful? Template-driven workflows keep output consistent across topics and authors.
WordLift and structured data tools
WordLift is less about writing from scratch and more about making content machine-readable.
That matters when schema, entities, and semantic relationships affect how WordPress content gets understood and surfaced.
Is this really “publishing”? Not in the usual draft-to-post sense.
It is closer to semantic enhancement before or during publication.
Why use it? Schema injection can make content clearer for search systems and content graphs.
Custom GPT API builds
Custom builds make sense when the workflow is unusual, high-volume, or tightly tied to internal rules.
If you need special approval logic, custom fields, or multi-step enrichment before WordPress receives the post, a build can beat a generic tool.
When should you build? When off-the-shelf tools keep forcing awkward workarounds.
When should you buy? When your publishing process is standard and speed matters more than customization.
Headless CMS connectors that push to WordPress
These setups are common in Strapi- or Netlify-style patterns, where content originates elsewhere and WordPress becomes the publishing endpoint.
They work well for teams already using a separate content source of truth.
What is the main benefit? One content source can feed multiple publishing destinations.
What is the catch? Mapping fields cleanly takes planning, especially for authors, categories, and custom metadata.
For most teams, the real decision is not which AI tool writes best.
It is which one fits the publishing path you already trust.

Feature and pricing comparison
A tool can write clean copy and still be a poor fit for WordPress publishing.
The real split is usually between editor-first tools, automation-first tools, and workflow tools that sit in the middle.
That matters because the buying decision is rarely about one feature.
It is about how much control you want over drafts, approvals, scheduling, and what happens after the post goes live.
Jetpack AI Assistant stays closest to the WordPress editor.
Zapier and Make.com sit on the automation side, where an AI step feeds a WordPress action through the REST API.
For teams building a more advanced pipeline, platforms like ScaleBlogger sit in the same broader category of automated content systems, especially when the goal is to move from draft generation to scheduled publishing with less manual handling.
WordPress publishing and workflow comparison
Zapier is easier to assemble for smaller workflows, while Make.com usually gives more control when the publishing path needs branches, checks, or multiple output formats.
Custom GPT and headless setups are where things get interesting.
They can be very flexible, but the tradeoff is maintenance, authentication, and the need to design your own guardrails.
The pattern is pretty consistent: editor-native tools win on simplicity, automation tools win on scale, and custom connectors win on control.
If the team cares about approval steps, draft gating, and publish logs, the automation layer matters more than the writing model itself.
Integration & workflows: how to connect an AI tool to WordPress
A clean WordPress connection usually fails for one boring reason: the auth step was treated like an afterthought.
Once the AI draft exists, WordPress still needs permission to accept it, save it, and sometimes schedule it without a human clicking around in the dashboard.
That is why the most dependable setup uses the WordPress REST API behind the scenes, with an automation layer like Zapier or Make.com handling the handoff.
If the AI writes outside WordPress, the workflow should move through a draft first, then review, then scheduling, then publish.
Jetpack AI Assistant follows a different path.
It keeps the generation inside the WordPress editor, which means fewer moving parts and less room for a broken connection.
Authentication that actually holds up
The safest choice depends on where the content is being created.
Self-hosted WordPress often works well with application passwords, while managed setups may prefer OAuth or a platform-specific token flow.
- Application passwords: Simple for WordPress REST API calls, especially when a tool needs to create or update posts.
- OAuth: Better when a third-party app needs a cleaner permission handoff and token-based access.
- API keys: Useful on the AI side, but WordPress still needs proper authenticated access for publishing actions.
A practical setup for ScaleBlogger or similar tools is to generate content first, then send only approved drafts into WordPress.
That keeps the publishing layer separate from the writing layer, which is exactly where it should be.
A publish chain that does not get messy
The best workflow is usually draft -> review -> schedule -> publish.
That order gives editors one clear checkpoint before anything goes live.
- Generate the draft in the AI tool or automation platform.
- Map fields carefully so the title, body, excerpt, and tags land in the right WordPress fields.
- Save as draft instead of publishing immediately.
- Review and approve inside WordPress or a connected approval step.
- Schedule or publish once the post passes quality checks.
This walkthrough is worth watching because the hard part is not the AI writing step.
It is the field mapping, auth, and scheduling chain that keeps everything predictable.
When something breaks
A good workflow assumes failure.
If a post creation call fails, the automation should stop, log the error, and avoid sending a half-finished article live.
WordPress revisions help here too.
If the published version needs to be rolled back, a revision is usually faster and cleaner than rebuilding the post from scratch.
- Draft first: Never let the first successful API call publish directly.
- Log failures: Capture the response code and payload for debugging.
- Keep revisions on: They make rollback fast when AI output needs cleanup.
- Add a human gate: One approval step saves a lot of damage.
That setup keeps the system useful without turning WordPress into a firehose.
The workflow stays controlled, and the content still moves fast.

SEO, metadata, and content quality controls
AI drafts fail in boring places.
The copy can read well and still miss the details that decide whether it ranks, gets clicked, or looks right when shared.
That usually starts with metadata.
A solid workflow treats the title, description, schema, and social preview fields as part of the publish step, not as cleanup work after the fact.
With WordPress REST API publishing, tools like Zapier and Make.com can create a draft and map those fields before a human ever opens the editor.
Quality control matters just as much.
The safest setup uses automated checks for required fields, then holds the post in draft until someone confirms the content, tone, and keyword targeting.
Metadata fields worth automating
| Metadata field | Why it matters | Auto-populate (yes/no) | Recommended tool/plugin |
|---|---|---|---|
| Meta title | Shapes search snippets and click-through | Yes | Yoast SEO, Rank Math, or a WordPress automation flow |
| Meta description | Influences how compelling the result looks in search | Yes | Yoast SEO, Rank Math, Zapier, or Make.com |
| Focus keyword / keyphrase | Keeps the draft aligned with one clear search target | No | Yoast SEO or Rank Math |
| Canonical URL | Helps search engines understand the preferred page version | Yes | Yoast SEO, Rank Math, or WordPress core canonical handling |
| Schema (Article/FAQ) | Supports richer search understanding and structured results | Yes | Yoast SEO or Rank Math |
| Open Graph image | Controls social preview appearance on shares | Yes | Yoast SEO, Rank Math, or the WordPress featured image setup |
| Robots index/follow | Sets whether the page should be indexed and followed | Yes | Yoast SEO or Rank Math |
| Slug/permalink | Keeps URLs readable and consistent | Yes | WordPress core, with SEO plugin review |
Titles and descriptions can be mapped automatically, while the keyphrase still deserves a human pass because AI guesses are often too broad.
The strongest quality gate is simple: generate a draft, validate the required fields, then stop before publish.
That gives editors time to catch missing schema, weak meta descriptions, or a tone that drifted away from the style guide.
This is also where plugin choice matters.
Jetpack AI Assistant keeps drafting inside the WordPress editor, while Zapier or Make.com can move content through a multi-step workflow before it lands in WordPress.
Either way, the same rule holds: let automation handle the repetitive checks, then let a person make the final call.
That keeps the publishing flow fast without turning it sloppy.
And in SEO, sloppy metadata is usually where good content starts leaking clicks.
Measuring performance & analytics after publishing
A post can look polished in WordPress and still miss the mark once it goes live.
The real signal shows up after publication, when traffic, clicks, and conversions start telling a different story.
The cleanest way to judge AI-published content is to track three layers: visibility, engagement, and business action.
That usually means sessions and impressions for traffic, click-through rate for interest, and sign-ups, leads, or purchases for outcomes.
A simple cohort map makes this far easier to read.
Tag each AI-generated post before it ships, then compare those posts against human-written content, by topic cluster, format, or publish date.
The diagram shows a plain path from tagging in the content workflow to reporting in GA4, then into side-by-side cohort comparisons.
That setup keeps the numbers honest, because you are not mixing every post into one blurry average.
Once the data is grouped cleanly, the patterns get much easier to spot.
One cluster may pull strong traffic but weak conversions, while another earns fewer visits and still drives better leads.
- Traffic: Watch sessions and landing-page views, not just total page views.
- CTR: Compare headline variants, meta descriptions, and social snippets.
- Conversions: Track form fills, demo requests, email sign-ups, or other real actions.
- Tags: Use a consistent label such as
ai-generated,human-edited,topic-cluster, andpublish-month.
- Benchmarks: Compare AI posts against similar human posts, not against every post on the site.
- Pitfalls: Avoid judging a post too early; some topics need a longer run before the pattern settles.
The most common mistake is treating every AI draft the same.
A WordPress post that was lightly edited by a human should not sit in the same bucket as a fully automated draft from tools such as ScaleBlogger, especially if your goal is fair benchmarking.
Another trap is chasing traffic alone.
A post that attracts clicks but no conversions usually needs a sharper offer, tighter internal links, or a better match between the title and the page.
Keep the review loop tight.
Tag, compare, adjust, then publish the next version with one clear change at a time.
That is where the real improvement shows up.
Security, compliance, and editorial governance
An AI draft is harmless until it leaves the sandbox.
The real risk starts when content, prompts, and brand notes move into third-party systems without clear rules.
That is why the safest publishing setup is usually boring in the best way: keep sensitive material out of the AI step when possible, send only what the model needs, and publish through WordPress with tightly controlled permissions.
If the workflow uses the WordPress REST API, such as /wp/v2/posts, the account behind it should only have the access needed to create or update posts, not broad site control.
Privacy boundaries first
Third-party AI tools can see whatever gets pasted into them.
That may include unpublished product details, client names, internal links, or source material that was never meant to leave the team.
A cleaner pattern is to redact sensitive fields before generation, keep private notes outside the prompt, and use draft mode for anything that still needs a human pass.
Jetpack AI Assistant keeps generation inside the WordPress editor, which is simpler for teams that want content creation to stay within the normal review flow.
Permissions should stay narrow
Publishing access should not be a free-for-all.
WordPress roles already give a useful structure, and the safest setup is to separate who writes, who reviews, and who can publish.
That matters even more when Zapier or Make.com is involved, because those tools can connect AI output to WordPress actions very quickly.
Use the least privilege possible, and let automation create drafts unless there is a very strong reason to publish automatically.
- Draft creation only: The automation writes the post, but a human approves it.
- Role separation: Writers prepare content, editors review it, and admins keep system access limited.
- Scoped credentials: Use the smallest viable WordPress account for API publishing.
- Sensitive data filtering: Strip out private names, numbers, and internal notes before the AI step.
Audit trails keep the process honest
When something goes wrong, provenance beats guesswork.
Keep a record of the prompt, source notes, final draft, approver, and publish time so the content trail is easy to follow.
That record also helps with compliance reviews and editorial accountability.
A workflow that can show who changed what, and when, is much easier to trust than one that relies on memory and screenshots.
A controlled pipeline is slower by a few minutes, and that is the point.
Those few minutes buy cleaner approvals, less risk, and a publishing process that does not become a mystery later.
Cost considerations and when to build a custom connector
A $20 monthly tool can turn into a much larger bill once publishing gets serious.
The price tag is rarely just the software license; it also includes API calls, automation runs, hosting, review time, and the headaches that come with a brittle setup.
That is why pricing models matter so much. Per-word tools can look cheap at first, but they become awkward when a team publishes often. Subscription tiers are easier to predict, though they often cap usage or lock useful features behind higher plans. API credits can fit variable workloads well, but they punish heavy generation and revision loops.
And if the workflow uses your own server, there is a real hosting cost too, especially when WordPress auth, webhooks, and custom middleware need to stay online.
The turning point for a custom GPT plus WordPress connector usually comes when the workflow stops being simple.
Zapier and Make.com work well for standard “generate then post” paths, and the WordPress REST API handles authenticated creation and updates cleanly.
But once you need topic rules, multi-step approvals, different outputs for different sites, or field mapping that changes by client, a custom connector can be cheaper than stitching together three separate tools every month.
A good test is this: if the workflow has the same shape every time, buy a tool.
If it changes by client, channel, or content type, build the connector.
- Predictable volume: If output is steady, a subscription is usually safer than per-word billing.
- Variable volume: If some weeks are quiet and others are heavy, API credits may waste less money.
- Compliance or control needs: If drafts must stay on your infrastructure, factor in hosting, maintenance, and access management.
- Complex routing: If content needs different prompts, formats, or publish rules, custom logic often pays for itself.
- Team handoff costs: If editors keep fixing the same workflow issues, the hidden cost is labor, not software.
A simple TCO checklist keeps the math honest.
Count the AI model cost, automation platform fees, WordPress hosting impact, connector maintenance, QA time, and the cost of failed or duplicated posts.
Then add the cost of changing the system later, because that is where cheap setups get expensive fast.
For teams comparing automation platforms and custom builds, this is the part that decides the budget.
The cheapest path on paper is often the one that costs more after six months.
Publishing Is Where the Real Work Begins
The strongest advantage of an AI WordPress tool is not that it writes faster.
It is that it removes the awkward middle step where drafts sit in a tab while someone cleans up formatting, fixes metadata, and republishes by hand.
Once that friction disappears, the workflow starts behaving like a system instead of a pile of chores.
That is why the tools that looked best in the body of this article were not just the ones with decent writing.
The better ones handled the full path from draft to WordPress, while still giving enough control for SEO, governance, and post-publish tracking.
A setup like that matters even more for teams that need consistency across many posts, many authors, or many brands.
Pick one article and run it through your current workflow today. Time every handoff, note every manual fix, and see where the process actually breaks.
If the publishing step still feels clumsy, tools like
