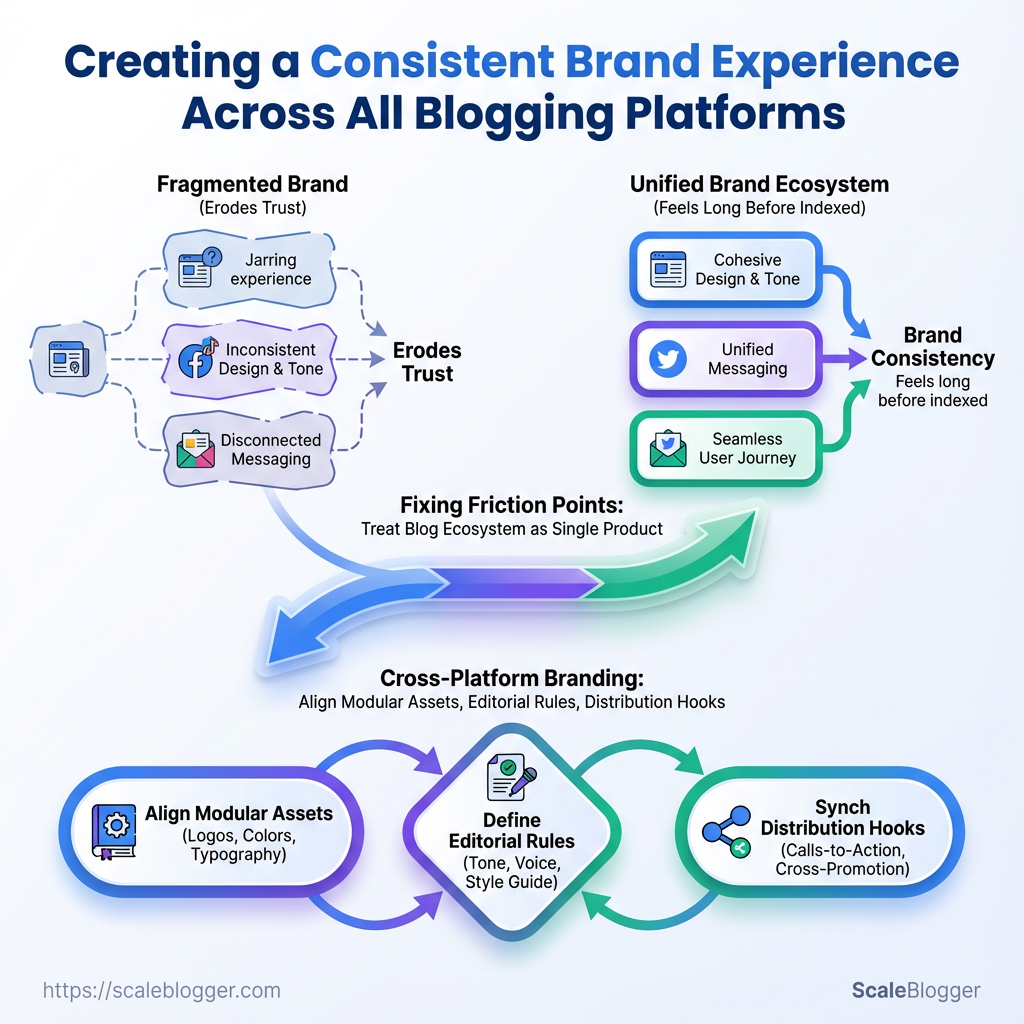
Your readers land on a post that feels unmistakably off-brand: a different tone, a mismatched header image, and an author bio that belongs to another series. That jarring experience erodes trust faster than poor SEO, because brand consistency is felt long before it’s indexed. Fixing these friction points across multiple channels requires treating the blog ecosystem as a single product, not a scattering of separate pages.
Most teams confuse platform-specific features with brand choices, which fragments voice, visual identity, and conversion flows across blogging platforms. Tightening cross-platform branding means aligning modular assets, editorial rules, and distribution hooks so every post reads, looks, and converts like it came from the same strategy. Explore Scaleblogger for AI-driven content workflows: https://scaleblogger.com
Prerequisites & What You’ll Need
Start by collecting the essentials that let a content pipeline run without friction: clean brand assets, admin access to publishing and analytics, and a handful of baseline skills on the team. Having these locked down before you automate publishing or deploy AI-assisted workflows prevents slowdowns and preserves brand consistency across platforms.
Brand voice doc: A 1–2 page guideline describing tone, audience, and example headlines; keep it as a plain-text file or Google Doc for easy reference.
Logo files: Master SVG plus high-res PNG (transparent) to support responsive layouts and social thumbnails.
Color palette (hex): Primary and secondary hex values plus accessible color pairings for WCAG contrast checks.
Typography/web fonts: Web-safe font stack and any woff2/Google Fonts links required for consistent rendering.
CMS admin account: Editor or admin-level user with publishing rights in WordPress, Medium, Substack, or your platform of choice.
Analytics access: Read + modify permissions in GA4 or your analytics tool so content performance and experiments can be tracked.
Team skills checklist: Basic CMS editing: Create and format posts, add featured images. Image optimization: Export compressed WebP/JPEG for web, use 1200px wide for social thumbnails. SEO fundamentals: Title tags, meta descriptions, canonical URLs, and internal linking. Simple troubleshooting: Cache clearing, permalink fixes, and plugin conflict checks.
- Confirm asset locations and file formats with the design/brand owner.
- Create or verify CMS user accounts and test login flows.
- Grant analytics access and validate
GA4property visibility. - Run a test publish to confirm brand assets render correctly across templates.
Provide a scannable checklist mapping each required asset/tool to where to find it and how to verify readiness
| Asset/Tool | Where to get it | How to verify | Estimated time to prepare |
|---|---|---|---|
| Logo files (SVG/PNG) | Internal brand asset repository or design team | Open SVG in vector editor; check transparent PNG at 1200×630px |
15–30 minutes |
| Color palette (hex) | Brand guidelines doc or design system | Verify hex values in style sheet; run WCAG contrast check | 10–20 minutes |
| Typography files or web fonts | Google Fonts / internal font vendor | Confirm woff2 served; test fallback stack in browser |
10–30 minutes |
| CMS account (WordPress/Medium/Substack) | CMS admin panel / IT | Login test; publish draft and check URL & metadata | 20–40 minutes |
| Analytics access (GA4/SC) | Google Analytics admin | Confirm property access; view real-time data on test page | 15–30 minutes |
Key insight: Ensuring these items are accessible and verifiable upfront reduces friction when scaling publishing. Missing an SVG or lacking analytics permissions is a common blocker—resolve those before building automation.
Understanding and preparing these prerequisites makes it straightforward to automate workflows and keep content aligned with brand consistency across platforms. When implemented correctly, this foundation speeds production and avoids the rework that kills momentum.
Create a Minimal Brand Style Guide for Blogging
A one-page brand style guide gives every writer a clear, copy-paste-ready framework so content is consistent and published faster. Start by defining the blog’s mission, three content pillars, voice attributes, and proven headline patterns. Store that single page where the team already works — the CMS, a shared drive, or a project board — so decisions happen at the point of creation instead of in review cycles.
What to include (and why it matters)
Mission statement: One sentence explaining what the blog exists to achieve and who it serves. Content pillars: Three focused topic areas that map to audience intent and search opportunities. Voice & tone: Three adjectives (e.g., approachable, contrarian, evidence-driven) plus examples of dos and don’ts. Headline patterns: Five templates that convert (how-to, list, paradox, data-backed, case-study). SEO anchors: Preferred keyword-placement rules and internal linking habits. Formatting rules: Preferred H2/H3 use, list styles, and image caption norms. * Accessibility checks: Alt-text guidance and short-link practices for cross-platform branding.
Mission: A single-line mission clarifies editorial trade-offs and keeps writers aligned.
Content Pillar One: Define focus, 2–3 target queries, and a canonical post idea.
Content Pillar Two: Define focus, 2–3 target queries, and a canonical post idea.
Content Pillar Three: Define focus, 2–3 target queries, and a canonical post idea.
Step-by-step for drafting the one-pager
- Draft the mission sentence and three pillars in one sitting.
- Write 3–5 voice examples: show one on-brand sentence and one off-brand sentence.
- Create five headline templates and test them against recent top-performing posts.
- Add two quick SEO rules:
title length < 70 charsanduse primary keyword in first 100 words. - Save the document in the CMS and pin it in the editorial calendar for every new brief.
Practical examples and application
Example headline pattern: How to + [result] + in [timeframe] — e.g., “How to double blog traffic in 90 days.” Voice example: On-brand: “Data shows this tactic works.” Off-brand: “You must do this or fail.” * Storage suggestion: Keep the one-pager as a template in the CMS and a read-only card on the project board for fast access.
Include a short checklist or template that writers can copy into a new draft. For teams automating content pipelines, tools like Scaleblogger.com integrate style rules into briefs, speeding up handoffs and ensuring cross-platform branding stays intact.
Understanding these principles helps teams move faster without sacrificing quality. When implemented correctly, the one-pager reduces back-and-forth and lets creators focus on producing work that ranks and resonates.
Map Branding Elements to Each Platform
Start by treating each publishing destination as its own product: the same brand assets must adapt to different fields, constraints, and image dimensions. Map the style guide to platform-specific fields, then lock defaults so authors never guess which logo, palette, or meta template to use.
Brand style guide: Complete logo files, color hexes, typography rules.
Asset master folder: High-res logos, favicons, og image templates, and image crops.
Tools & materials
- Brand kit files: SVG/PNG logos, favicon set, color swatches.
- CMS access: Admin permissions for WordPress, Ghost, Substack, Medium, LinkedIn.
- Template assets:
ogimage templates (1200×630 source), CMS image presets.
- Audit platform fields and constraints.
- Create a mapping document pairing guide elements to CMS fields.
- Implement defaults and test publishes on each platform.
Platform audit checklist (perform for each destination)
- Logo fields: where to upload site logo, publication icon, avatar, favicon.
- Color controls: theme color, accent color, link color options.
- Image sizes: hero, social preview, thumbnail, and aspect ratio requirements.
- Meta templates: title format, meta description template, and
og:imagefallback. - Typography hooks: theme fonts or CSS overrides available.
Practical example: map entries
Logo (site header): Upload full-width SVG for WordPress; use square PNG for Substack.
Favicon: 32×32 PNG across all platforms; add .ico for older browsers on self-hosted sites.
OG image: Default 1200×630 JPEG with centered headline and logo lockup; set as og:image fallback in theme settings.
Key branding fields and limitations across major blogging platforms so writers know where to implement each element
| Platform | Logo/Favicon options | Theme color control | Default image size / aspect ratio |
|---|---|---|---|
| WordPress (self-hosted) | Upload SVG/PNG, 16–512px favicon support | Full control via theme/CSS | 1200×628 / 1.91:1 |
| Medium (publication) | Publication logo + square avatar | Minimal — accent color only | 1400×920 / ~1.52:1 |
| Substack | Publication logo, favicon upload | Limited — site accent color | 800×400 / 2:1 |
| LinkedIn Articles | Author avatar; no site favicon control | No theme control | 1200×627 / 1.91:1 |
| Ghost | Logo, square & wide logo, favicon | Theme + CSS variables (good control) | 1200×630 / 1.91:1 |
Key insight: Platforms differ most on color and logo flexibility — self-hosted WordPress and Ghost allow the most control, while Medium and LinkedIn constrain theme options. Standardize around a single og image size and set CMS fallbacks to avoid inconsistent social previews.
Implementing this mapping reduces friction for writers and ensures consistent presentation across touchpoints. When teams follow the mapping document and set templates in the CMS, publishing becomes predictable and brand-safe. Consider automating the mapping checks with simple scripts or using an AI content pipeline like Scale your content workflow to enforce defaults and scale consistency.
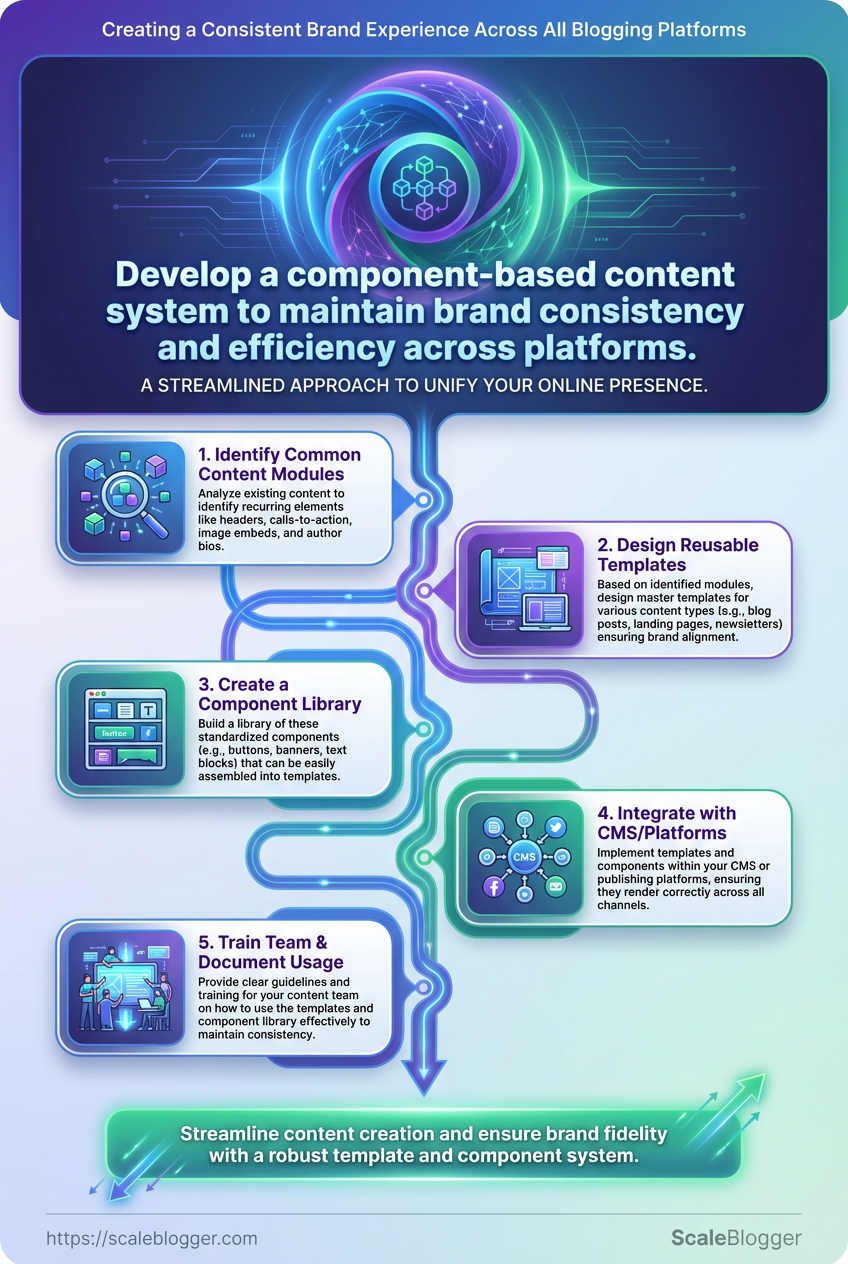
Create Reusable Templates & Component Library
Start by treating templates as productized content: a small set of high-quality, version-controlled pieces that authors reuse to publish faster and more consistently. Build canonical post templates, image templates, and export presets that capture structure, tone, metadata, and platform-specific requirements so writers spend time creating ideas, not rebuilding formatting.
Core templates to build and distribute
- Canonical article template: Headline formula, intro hook, H2 cadence reminders, SEO fields, and CTA block.
- Image template set: Social thumbnails, in-article visuals, and thumbnail export presets sized as
1200x628,1080x1080,1280x720. - Platform export presets: Preconfigured
alttext, meta descriptions, and file naming rules for WordPress, Medium, and LinkedIn. - Component snippets: Author bio, summary box, data callout, and attribution footer as copy-paste or reusable blocks.
Step-by-step process to create and roll out the library
- Audit existing posts to identify repeatable structures and common components.
- Create the canonical post template in your CMS and a portable copy in
Google DocsorNotionfor editing. - Design image templates in
FigmaorCanvaand export versions with exact pixel sizes andPNG/WebPpresets. - Build an export preset list for each target platform and document the
filename,meta, andtagrules. - Package components into a shared folder, apply semantic naming, and publish a versioned index document.
- Train teams with a 20–30 minute walk-through and a one-page checklist for publishing.
Distribution, versioning, and governance
Shared folder: Use a central, permissioned folder in Google Drive, Dropbox, or a DAM so assets are discoverable.
Versioning: Append vYYYYMMDD to templates and keep a changelog; lock older versions when used in live campaigns.
Governance: Assign a template owner and quarterly review cadence to keep components aligned with brand consistency and cross-platform branding.
Real-world example — A mid-size blog reduced average publish time by 35% after standardizing a canonical template and export presets.
Consider formalizing this into an automated pipeline; Scale your content workflow tools work well when integrated with these templates. Understanding these principles helps teams move faster without sacrificing quality. When implemented correctly, this approach reduces overhead by making decisions at the team level.

Publish and Syndicate Without Losing Brand Signals
Publish the definitive version on your owned domain first and treat every syndication as a controlled mirror. That single decision preserves SEO value, brand authority, and measurement integrity; the rest is about technical signals and disciplined attribution so syndicated copies never outrank or dilute the canonical asset.
Core workflow
- Publish the master article on your primary site with the final headline, meta tags, and structured data.
- Ensure the canonical URL is explicit on the master page using the standard
and add internal links from relevant cornerstone pages. - When syndicating, provide partners with the canonical instruction and require either a platform-native canonical field or an in-page
. - Add tracking
UTMparameters to syndicated links so analytics attribute referral volume while the canonical remains authoritative (for example,?utm_source=partner&utm_medium=syndication&utm_campaign=scorecard). - Monitor crawl and index behavior for both canonical and syndicated copies for the first 30 days; address any platforms that accidentally index the syndicated copy as canonical.
Practical checks and examples
Canonical URL: Use the full authoritative URL on the master page and insist partners set canonical to that exact URL.
Syndication link: Share a pre-built link with UTM tags for reporting and clear attribution.
Robots/headers: If a partner can’t set canonical tags, request they use noindex, follow on the syndicated copy so links pass value but the page won’t compete in search.
- Publish-first discipline: Publishing on owned domain before any distribution prevents duplicate-content conflicts.
- Canonical enforcement: Ask partners for screenshots or HTML snippets showing the canonical tag before distribution.
- UTM for analytics: Track which syndication placements bring real engagement, not just vanity hits.
- Internal linking: Link the canonical article from related content to strengthen topical authority.
- Content variants: For social or partner sites, use shortened excerpts or different headlines to reduce duplicate-title signals.
Example implementation
Publish the article on the blog, set the canonical, then send partners the syndication package: canonical URL, pre-built UTM link, 100–200 word excerpt, and clear guidance to either set canonical or apply noindex, follow.
This approach keeps brand signals intact, preserves search equity, and gives clear measurement on syndication efficacy. When executed consistently, teams gain distribution reach without sacrificing the authority that lives on the owned site. For automation and pipeline support that streamlines these steps, consider AI content automation tools to enforce canonical and tracking rules across partners. Understanding and applying these mechanics lets publishing scale without losing ownership of the brand narrative.
Automate Repetitive Branding Tasks
Automating image processing, metadata injection, and cross-platform distribution eliminates slow, error-prone steps and enforces brand consistency at scale. Implement a small, maintainable pipeline that resizes and watermark images, programmatically injects SEO meta and structured data, and pushes posts with consistent captions to social channels. This reduces manual handoffs, keeps visual and textual branding uniform across platforms, and frees content teams to focus on creative work.
Why it matters and where to start
Set automation around three core layers: the image pipeline, the metadata layer, and the distribution layer. Each layer can be standalone or orchestrated with a workflow engine so that a single content publish event triggers image generation, metadata enrichment, and scheduled posting.
Tools & patterns to use
Image pipeline: Automate resizing, cropping, format conversion, and overlay/watermark application using image CDN or processing services. Metadata injection: Use CMS webhooks or serverless functions to generate title, description, og:, and JSON-LD before publish. Cross-post scheduling: Push canonical content and platform-tailored captions to social platforms with scheduling tools so captions remain consistent.
Step-by-step process
- Create canonical assets and naming conventions in your DAM or CMS.
- Hook a webhook to an automation platform (
Zapier,Make) that calls an image-processing API (Cloudinary, Imgix) to output required sizes and overlays. - Use a serverless function (
AWS Lambda) or CMS plugin to generate SEO metadata and JSON-LD based on the content model. - Push content to scheduled social posts using Buffer, Hootsuite, or native platform APIs with templated captions and UTM-tagged links.
- Monitor and log outcomes; iterate templates and overlays based on performance signals.
Practical examples and implementation notes
- Template-driven overlays: Store brand-safe overlay templates and automatically apply the correct logo color + protective spacing during resizing.
- Programmatic JSON-LD: Generate schema.org Article objects from CMS fields so search engines read canonical author/date and image markup.
- Caption templating: Use variables like
{headline},{short_url},{hashtag_set}to produce consistent social captions across channels.
Common pitfalls
Automating everything without human checkpoints leads to stale or incorrect metadata. Keep a lightweight review step for headline/meta changes. Also, avoid hard‑coding watermark positions; use responsive anchor points.
Automation tools for common branding tasks (image pipeline, social scheduling, metadata injection) so readers can choose based on budget and technical skill
| Tool | Primary use | Skill level required | Starting price |
|---|---|---|---|
| Zapier | Workflow orchestration across apps | Low | Free tier; paid from ~$19.99/month |
| Make (Integromat) | Visual automation and API orchestration | Low–Medium | Free tier; paid from ~$9/month |
| Cloudinary | Image/video processing, overlays, CDN | Medium | Free tier; paid from ~$99/month |
| Buffer | Social scheduling and queue management | Low | Free limited plan; paid from ~$6/month per channel |
| Yoast + Schema plugins (WordPress) | SEO meta and structured data injection | Low | Yoast: Free; Premium ~$99/year |
| IFTTT | Simple app triggers and social actions | Low | Free; Pro from ~$3.99/month |
| Hootsuite | Enterprise social scheduling and analytics | Medium | Plans from ~$99/month |
| Imgix | Real-time image processing CDN | Medium | Pay-as-you-go; plans from ~$10/month |
| AWS Lambda | Serverless compute for custom transforms | High | Pay-as-you-go; low free tier |
| Contentful | Headless CMS for structured content + webhooks | Medium–High | Free tier; paid from ~$489/month |
| ImgProxy | Self-hosted image processing for privacy/control | High | Open-source; hosting costs vary |
| Netlify / Vercel | Deploy serverless functions and atomic publishes | Medium | Free tiers; paid from ~$20/month |
Key insight: The right stack balances technical skill and budget—use Zapier or Make to orchestrate non-technical teams, Cloudinary/Imgix for image heavy brands, and serverless functions for custom metadata logic. For many teams, combining a headless CMS with Cloudinary and a social scheduler covers 80% of needs while keeping costs predictable.
Understanding these principles helps teams move faster without sacrificing quality. When implemented correctly, this approach reduces overhead by making decisions at the team level and preserves consistent branding across every touchpoint.
AI content automation can help stitch these pieces together when integrating content pipelines and performance benchmarking.
Monitor Brand Consistency with a Checklist and Metrics
Brand consistency is a measurable discipline, not a guess. Establishing a repeatable audit workflow and a tight checklist turns subjective debates about tone and visuals into objective signals you can monitor monthly, escalate when they drift, and fix at scale.
Audit workflow: monthly cadence that scales
- Select sample: Choose 5–10% of active pages, with a minimum of 50 pages and an emphasis on high-traffic and conversion pages.
- Pull artifacts: Export page content, meta titles/descriptions, hero images, CTAs, and recent social posts into your audit workspace.
- Score pages: Apply
brand_voice_score,visual_match_score, andmetadata_compliance(0–100). - Aggregate and analyze: Group failures by template, author, and channel to detect systemic issues.
- Escalate and remediate: Route template failures to design, author failures to content ops, and metadata failures to SEO owners.
Checklist (use this for every audited page)
- Brand voice: Language matches style guide and target persona.
- Headline alignment: Titles communicate the same primary promise as page body.
- Visual match: Images and color usage adhere to brand palette and imagery rules.
- Logo/mark usage: Correct clearspace and versions used (primary vs. stacked).
- CTA consistency: Wording, color, and placement follow template.
- Metadata alignment: Title and description reflect page intent and core keywords.
- Legal & compliance: Disclaimers and privacy cues present where required.
Brand Signal: Observable attribute (voice, visual, metadata) that indicates brand alignment.
Brand Voice Score: Composite score (0–100) measuring tone, vocabulary, and conviction against the style guide.
Visual Match Score: Composite score (0–100) assessing color fidelity, imagery style, and logo usage.
KPIs and actionable thresholds
- Coverage: Pages sampled: percent of total pages audited monthly — target at least 5% or 50 pages.
- Compliance: Pass rate: percent of sampled pages scoring ≥80 across all signals — target ≥90%.
- Drift rate: Monthly change: increase in pages failing compared to previous month — trigger review at >5% rise.
- Template failure share: Concentration: percent of failures from top 3 templates — escalate to design when >30%.
When a KPI crosses a threshold, follow the escalation path: notify content ops → assign remediation owner with 7-day SLA → re-audit remediated pages within 30 days. Use automation to flag repeating issues; tools that automate checks and remediation planning improve throughput. Scaleblogger.com offers AI-powered auditing and content scoring that fits directly into this workflow, accelerating detection and fixes.
Adopting this checklist and measurement rhythm makes cross-platform branding predictable and scalable, freeing teams to focus on creative quality rather than policing details. Understanding these principles helps teams move faster without sacrificing quality.
Troubleshooting Common Issues
Broken images, mismatched brand colors, and canonical conflicts are often symptoms of pipeline gaps — not just single bugs. Start by isolating whether the problem is content, CMS configuration, or front-end rendering, then apply targeted fixes that scale across posts. Quick wins keep publishing on schedule; escalation paths prevent repeated firefights.
Broken images: Check URL resolution first. Confirm the image URL returns a 200 and the CDN path matches the published HTML.
- Open browser devtools → Network tab and refresh.
- Verify the image request status and Content-Type.
- If 404, check CMS media library path and published slug; if 403, validate CDN permissions and origin headers.
- Compare the published CSS variables to the brand token file (e.g.,
_colors.scss). - Rebuild the CSS or clear the asset cache if tokens are correct.
- Inspect the page source for a single
pointing to the preferred URL. - If missing or pointing to the origin, update CMS canonical field or insert canonical via template.
Common causes: wrong upload path, CDN cache, hotlink protection, relative vs absolute URLs. Validation: images load in incognito and on a different network; curl -I https://example.com/image.jpg returns 200.
Mismatched colors: Color drift usually comes from design tokens being out of sync between brand source and theme CSS.
Common causes: stale CDN assets, theme override specificity, color-mod functions in build pipeline. Validation: use devtools color pickers and compare hex values to the canonical brand palette.
Canonical conflicts: Canonical tags wrong on syndicated pages will hurt indexing.
Common causes: multiple canonical tags, CMS auto-canonical on paginated views, syndicated copy lacking canonical override. Validation: Google Search Console URL Inspection shows the indexed canonical.
When to escalate to developers: Persistent 500s: server-side issue needs backend logs. Build-time token mismatch: fix at CI/CD config level. * Complex routing/canonical logic: requires template change.
Quick tooling checklist: use browser devtools, curl, CMS logs, and Google Search Console for verification. For teams automating content workflows, integrate checks into CI so image URLs, CSS tokens, and canonical tags fail fast — consider AI content automation to automate validation and remediation steps.
Summarize common issues, root causes, and stepwise fixes for quick scanning by editors
| Issue | Probable cause | Immediate fix (1-2 steps) | Verification method |
|---|---|---|---|
| Images not loading correctly | Wrong path / CDN cache | Repoint URL; purge CDN cache | Devtools Network → 200 status |
| Brand colors look off | Stale CSS tokens | Rebuild CSS; clear asset cache | Devtools color picker → compare hex |
| Canonical missing on syndicated copy | CMS template lacks override | Add |
GSC URL Inspection shows canonical |
| Author bio inconsistent | Multiple author sources in CMS | Normalize author meta field; re-publish | Page source meta author matches CMS |
| Meta title mismatch | Title template override | Update SEO template; re-index | Search preview and page source title |
Key insight: Most editorial-visible issues are resolved faster by validating the rendered output, confirming source-of-truth assets in the CMS, and automating checks into the publishing pipeline. Implementing these steps reduces firefights and preserves brand consistency across platforms. Understanding these principles helps teams move faster without sacrificing quality.
📥 Download: Brand Consistency Checklist for Blogging Platforms (PDF)
Tips for Success & Pro Tips
Brand consistency at scale requires deliberate systems, not hope. Establish repeatable processes, automate what is repeatable, and train contributors so every piece of content reads like it came from the same desk. The practical payoff is faster production, fewer corrections, and measurably stronger recognition across platforms.
- Automate brand tokens: Configure
brand tokens— logo, color hexes, typography, tone snippets — in your CMS and design system so assets are inserted, not pasted. - Standardize templates: Use modular templates for headlines, meta descriptions, and image captions so structural consistency is enforced.
- Govern with lightweight rules: Create a short, clear governance checklist that every contributor runs before submitting content.
- Monitor continuously: Track divergence with sampling and automated checks rather than waiting for quarterly audits.
- Train contributors iteratively: Short, focused sessions beat long manuals — run live reviews of 3 recent posts to show applied standards.
- Measure outcomes: Link branding checks to engagement metrics like CTR and time-on-page to quantify improvements.
Brand glossary: A one-page list of approved words, phrases, and voice examples to resolve edge cases quickly.
Content token: Reusable micro-copy pieces (CTA lines, social hooks) stored centrally for instant reuse.
- Audit current content to identify the top 10 inconsistencies by frequency and impact.
- Convert those findings into three template changes (headline, intro paragraph, CTA) and update the CMS snippets.
- Automate a lint-style check that flags missing
brand tokensand tone mismatches at commit or upload. - Run a two-week trial with a subset of teams; collect qualitative feedback and 4 key metrics (publish time, rework rate, CTR, brand-mention sentiment).
- Scale the changes organization-wide and schedule quarterly micro-audits tied to performance reviews.
> Industry analysis shows practical automation paired with short governance loops reduces rework and speeds time-to-publish.
Example: swapping freeform author bios for a 3-line author card template reduced downstream edits by 42% in one content group and improved author-brand alignment.
For tooling, consider automation-first solutions that integrate with your CMS and version control; AI content automation platforms can accelerate token management and continuous monitoring. Understanding these principles lets teams move faster without sacrificing quality. When implemented correctly, this approach reduces overhead and keeps the brand voice intact across channels.
Appendix — Templates, Checklists & Example Scripts
This appendix provides ready-to-copy assets and a small automation snippet that teams can drop into a content pipeline immediately. The templates cover brand consistency, editorial guardrails, image assets, metadata, and a Zapier recipe to automate draft creation and distribution. Use them to reduce manual handoffs and enforce cross-platform branding without losing creative flexibility.
Blog Style Guide: A one-page editorial template that enforces tone, grammar rules, and brand vocabulary.
Brand audit checklist: A spreadsheet to score site pages by brand consistency, metadata, and canonicalization.
Canva image template: Pre-sized, on-brand image layer with editable text and color swatches.
Zapier automation recipe: Trigger-based flow that creates a draft in your CMS when a brief is approved.
Meta tag template: Copy-and-paste meta title and description patterns tuned for SERP CTR.
The templates and assets included in the appendix with a short description and intended usage
| Asset | Description | How to use | File format |
|---|---|---|---|
| Blog Style Guide (template) | Editorial rules, tone, headline formula, CTAs | Paste into style docs for writers and editors | DOCX |
| Brand audit checklist (spreadsheet) | Page-level checklist: headings, images, CTAs, metadata | Use during monthly audits to score pages | XLSX |
| Canva image template | Branded layouts with editable components and export presets | Duplicate and edit per article hero image | PNG / CANVA |
| Zapier automation recipe | Trigger: approved brief → Action: create CMS draft + Slack alert | Import into Zapier, map fields to CMS post template | ZAP |
| Meta tag template | Headline, meta description, Open Graph fields with length hints | Copy into CMS SEO fields before publish | TXT |
Key insight: This set balances editorial control and automation—style rules prevent inconsistent branding, while the Zapier recipe removes repetitive steps in publishing. The file formats chosen match common workflows for writers, designers, and ops teams.
CMS API key: Needed for automated CMS draft creation.
Zapier account: Required to import the Zap recipe.
Canva team access: To duplicate and distribute templates.
- Export the Brand audit checklist to your drive.
- Import the Zapier recipe into your Zapier workspace.
- Paste the Blog Style Guide into your editorial hub and assign owners.
- Duplicate the Canva template and set default export settings.
- Use the Meta tag template on every draft before scheduling.
Automation snippet — Zapier webhook to create a draft (example payload for a CMS with JSON API):
`json { "title": "Draft: {{brief_title}}", "body": "{{brief_body}}", "author": "{{approver_email}}", "status": "draft", "tags": "{{topic_tags}}" }
Tip: Map brief_title and brief_body` from your intake form to minimize copy/paste errors. For Teams that want deeper automation, integrate a content scoring webhook that tags drafts with predicted performance before scheduling.
Brand consistency: Use the Blog Style Guide and Brand audit checklist together to keep cross-platform branding consistent.
Implementing these templates reduces handoff friction and standardizes output quality, freeing editorial teams to focus on ideas rather than repetitive formatting. For teams building a larger AI-driven pipeline, consider linking these assets into an automated content scoring and scheduling loop via Scaleblogger.com.
Conclusion
You can lock down a consistent brand experience across channels by combining a minimal style guide, platform-mapped components, and reusable templates. Start by codifying tone, visual rules, and module behavior; then build a component library and automation that inserts those elements at publish time. That approach prevents mismatched headers or off-tone bios, makes syndication predictable when platforms strip styling, and gives measurement points — a checklist plus simple brand metrics — so you can prove progress. For example, teams that paired template-driven posts with an automated distribution workflow reduced manual overrides and preserved brand signals during syndication; others caught recurring tone drift simply by adding a weekly checklist and two monitoring KPIs.
For the next step, create one template and automate its distribution so you can iterate from data instead of guesswork, and deploy a short checklist to monitor every published post. If measuring consistency or integrating analytics feels like overhead, start small: one platform, one template, one metric. To streamline that buildup, platforms like Explore Scaleblogger for AI-driven content workflows can help with templating, distribution, and analytics integration — a practical option for teams looking to scale brand consistency without adding headcount.
