

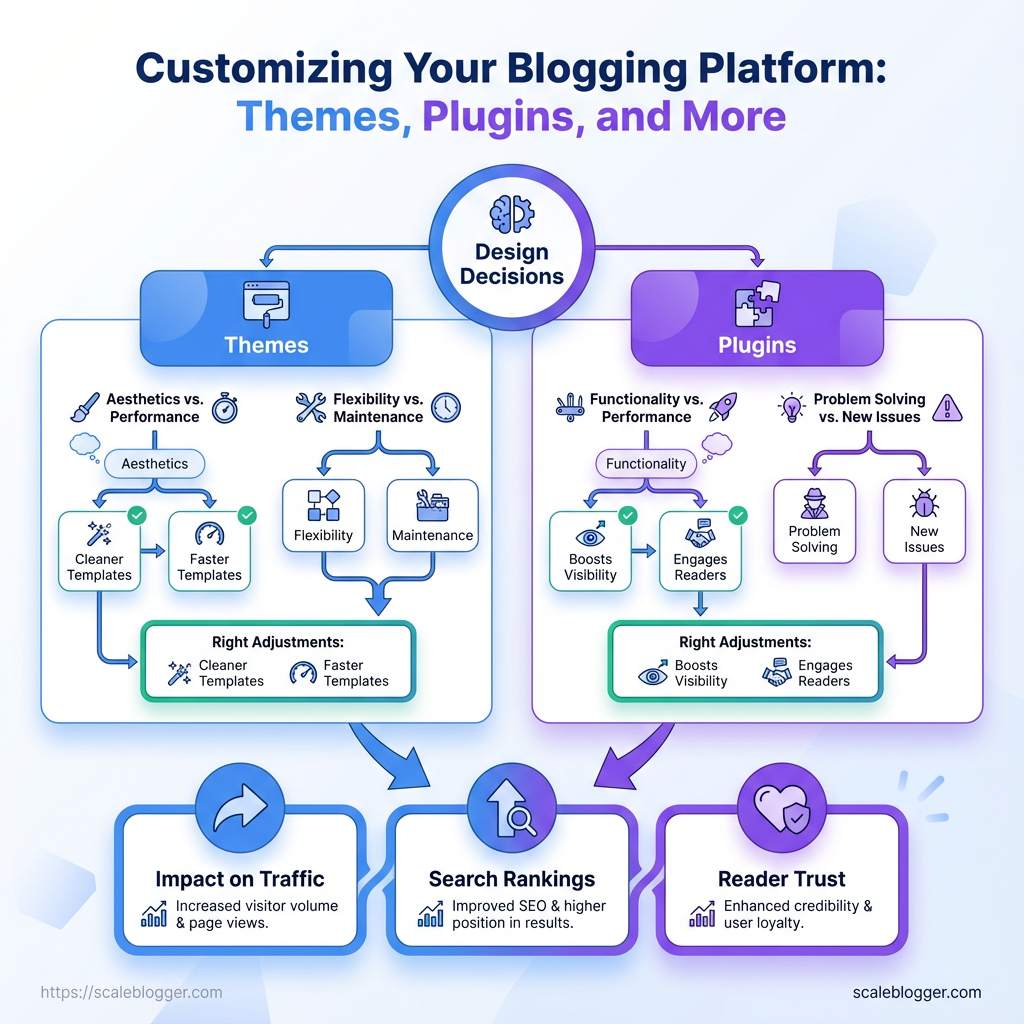
Customizing your blogging platform is about more than choosing a beautiful theme or installing useful plugins. Every design decision can affect site speed, SEO, usability, and reader experience.
A great-looking theme can hurt performance, while the wrong plugin can create SEO or compatibility problems. The goal is to balance design, functionality, and performance.
With the right blog themes and plugins, you can create cleaner layouts, improve functionality, and maintain a fast, user-friendly site without adding unnecessary complexity.
What You Need Before You Start
Start with the essentials to avoid problems later. Before customizing a blogging platform or adding new themes and plugins, make sure you have the right accounts, access, and basic skills. This approach saves time, avoids problems on the live site, and makes testing easier.
Hosting access: SSH or cPanel credentials with file and database privileges are required to install themes, run CLI commands, and restore files quickly.
CMS admin credentials: An account with administrator-level rights in the CMS (e.g., WordPress Administrator) lets you install plugins, modify theme files, and change rewrite rules.
Staging environment: A separate staging site that mirrors live hosting prevents accidental downtime while testing themes, plugins, or design changes.
Backup solution: Regular backups (file + DB) and a tested restore process avoid catastrophic data loss during customization.
Basic HTML/CSS knowledge: Enough to edit theme templates, tweak styles in style.css, or troubleshoot layout breaks when a plugin injects conflicting rules.
Optional automation tooling: An account with an automation tool or pipeline (CI/CD or an AI content pipeline) speeds deployments and content scheduling.
What permissions and accounts to request first:
- Hosting login: Ask for cPanel or SSH user with documented scopes. Database access: Read/write DB user or phpMyAdmin privileges. CMS admin: Two-factor enabled admin account.
- Version control:
gitrepo access if the project uses code deployments. * Third-party APIs: API keys for analytics, CDN, or SEO tools.
- Verify hosting and CMS credentials are working.
- Create a full backup and confirm restore on a sandbox.
- Clone the live site to staging and enable error logging.
Estimated time and difficulty:
- Time estimate: 2–6 hours to get accounts, create backups, and clone to staging; additional 1–3 hours if learning basic HTML/CSS is required.
- Difficulty level: Low-to-moderate for most marketers; moderate if SSH,
git, or DB restores are unfamiliar.
Quick reference of required items, why they matter, and recommended alternatives
Table: Prerequisites — What You’ll Need Before You Start — Prerequisite, Why it’s needed, How to obtain or set it up & more
| Prerequisite | Why it’s needed | How to obtain or set it up | Difficulty |
|---|---|---|---|
| Hosting access (cPanel/SSH) | Install themes, run CLI, manage files | Request credentials from hosting admin; enable SSH via control panel | Moderate |
| CMS admin credentials | Install plugins, edit theme, manage users | Create admin user with 2FA in CMS settings | Low |
| Staging environment | Test changes without affecting live site | Use hosting staging feature or create subdomain + clone site | Moderate |
| Backup solution | Protect files and DB; enable quick rollback | Use host backups, or plugins like UpdraftPlus; store offsite | Low |
| Basic HTML/CSS knowledge | Troubleshoot layout and styling conflicts | Short courses (Codecademy, free MDN guides); practice editing style.css | Low–Moderate |
A quick look at the table shows that most blockers are access and backups; once those are handled, customization becomes a focused technical task rather than a rescue mission. Having a staging site and tested backups turns risky experiments into safe iterations, and a little HTML/CSS fluency closes most troubleshooting loops.
Getting these pieces in place first makes the actual customization work faster, less stressful, and far more reversible—so projects ship cleanly and without surprises.
Key Takeaway: Picking a theme starts with aligning design… Choosing a theme begins with aligning design choices to what the blog needs to accomplish. It should capture attention, load quickly, and make content easy to find.
Step-by-Step: Choosing and Installing the Right Theme
Choosing a theme begins with aligning design choices to what the blog needs to accomplish. It should capture attention, load quickly, and make content easy to find. Choose a theme that prioritizes readability, performance, and flexible layout options that map to your content strategy — not just something that looks pretty in a demo. Test early and often: mobile previews, Lighthouse/performance checks, and plugin compatibility tests catch problems before launch.
Technical baseline: A recent backup, access to hosting control panel, and a staging site or local environment.
Content map: A simple list of post types, templates, and page designs you need (homepage, archive, single posts, author pages).
Tools & materials
Browser dev tools: Use mobile device emulation and network throttling.
Performance tools: Lighthouse or WebPageTest for core web vitals.
Plugin checklist: List of required plugins (SEO, cache, forms, analytics).
Selecting a Theme: what to check
- Design fit: Choose themes with templates matching your content hierarchy.
- Performance-first: Prefer themes that advertise minimal CSS/JS and lazy-loading.
- Plugin compatibility: Ensure important plugins are supported and tested.
- Update cadence: Active theme updates in the last 6–12 months is a good sign.
- Customization options: Check for
block editoror page-builder compatibility depending on workflow.
- Review 3–5 candidate themes and open each demo in mobile view.
- Run a quick Lighthouse audit on the demo homepage and a post template.
- Confirm plugin compatibility by searching theme docs for your key plugins.
- Check the theme changelog or marketplace listing for update history and support terms.
- Install the theme on staging, import demo content if available, and validate layouts with real posts.
Installing and testing
- Activate theme on staging.
- Import demo content or create representative posts.
- Configure typography, color palette, and layout settings.
- Run performance tests and fix obvious blockers (image sizes, excessive plugins).
- Test key user flows: subscribe, search, comments, and social sharing.
Definitions
Readability: Font sizes, line length, and typographic scale that make long-form content comfortable to read.
Core Web Vitals: Browser metrics (Largest Contentful Paint, Cumulative Layout Shift, First Input Delay) that impact page experience.
Staging environment: A clone of your live site used to test changes before publishing.
Side-by-side comparison of free vs premium theme trade-offs
Table: Step-by-Step: Choosing and Installing the Right Theme — Criteria, Free Themes, Premium Themes & more
| Criteria | Free Themes | Premium Themes | When to choose |
|---|---|---|---|
| Cost | Free | Typical pricing $29–$99 one-time or $50–$200/yr | Free for hobby blogs; premium when scaling/branding matters |
| Support & updates | Community support, irregular updates | Dedicated support, regular updates | Choose premium for mission-critical sites |
| Customization options | Basic settings, limited templates | Advanced options, header builders, custom layouts | Premium when unique layouts or branding required |
| Performance | Varies; many are lightweight ✓ | Often optimized; includes performance features ✓ | Test both; pick what scores better in Lighthouse |
| Security fixes | Depends on maintainer ✗ | Regular security patches and compatibility checks ✓ | Premium for high-traffic sites or paid products |
Key insight: Free themes are cost-effective for prototypes and personal blogs, but premium themes deliver stronger support, richer customization, and predictable updates; performance should always be validated empirically rather than assumed.
Choosing the right theme is an investment in the blog’s long-term visibility and reader experience. When in doubt, test candidates on staging, measure performance, and favor themes that let content — not chrome — take center stage. If automating theme tests or scaling content workflows is part of the plan, tools like Scaleblogger.com help validation and publishing steps.
Feature matrix of recommended plugin categories and example plugins
Table: Step-by-Step: Installing and Configuring Plugins Safely — Plugin Category, Recommended Plugins, Primary Benefit & more
| Plugin Category | Recommended Plugins | Primary Benefit | Configuration Notes |
|---|---|---|---|
| SEO | Yoast SEO, Rank Math | On-page optimization, sitemaps | Keep auto-XML sitemaps on; configure schema and social previews |
| Caching | WP Rocket ($49+/site), W3 Total Cache (free) | Faster page loads, reduced server CPU | Start with page caching + browser caching; avoid multiple caching plugins |
| Image Optimization | ShortPixel (free/paid), Smush | Reduced image weight, faster LCP | Use lossless first; enable lazy-load for below-the-fold images |
| Security | Wordfence (free/paid), Sucuri | Malware scanning, firewall | Run scans weekly; set firewall to learning then enforce mode |
| Backups | UpdraftPlus, Jetpack Backups | Point-in-time restores | Schedule regular backups; store offsite (S3/Dropbox) and test restores |
Key insight: Choosing well-supported plugins that follow best-practice defaults reduces friction. Start small, validate on staging, and monitor closely after production deployment.
For teams automating content workflows, consider integrating checks into the deployment process—Scaleblogger.com has tools to automate testing and scheduling so plugin-related regressions are caught earlier. Installing thoughtfully keeps the site nimble and resilient; that precision saves hours on firefighting later.
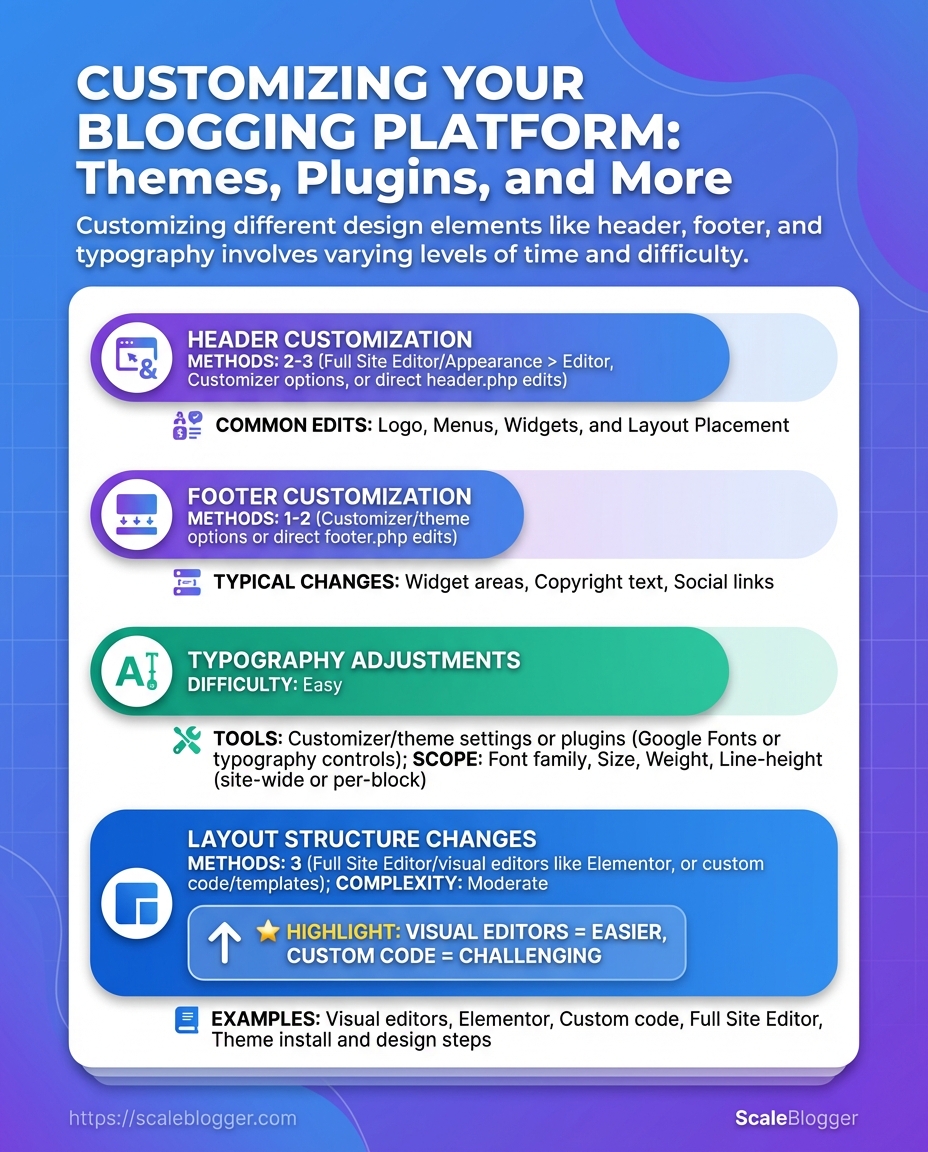
Key Takeaway: Start by treating header, footer, and typography as a single system: they set hierarchy, help users orient, and encode brand voice. A tidy, accessible header and footer plus a reliable type scale make content scannable on any device.
Key Takeaway: Start by measuring how your site currently performs and assess accessibility to identify key areas for improvement. Run a Lighthouse or WebPageTest audit to capture metrics like Largest Contentful Paint (LCP), Total Blocking Time (TBT), and…
Step-by-Step: Optimizing Performance and Accessibility
Start by measuring how your site currently performs and assess accessibility to identify key areas for improvement. Run a Lighthouse or WebPageTest audit to capture metrics like Largest Contentful Paint (LCP), Total Blocking Time (TBT), and the accessibility score. Then, focus on fixing issues like images, JavaScript delivery, and missing ARIA/alt text. Fixing those areas early increases speed for users and improves reach for people who rely on assistive tech.
Baseline audit: Run Lighthouse, WebPageTest or your preferred tool and export results.
Access: Admin access to CDN, hosting, and CMS theme/plugins.
Backup: Snapshot site and database before making structural changes.
Tools & materials
- Browser audit tools: Lighthouse, WebPageTest
- Image tools:
cwebp, Squoosh, or image-optimization plugins - Delivery tools: CDN (e.g., Cloudflare), caching plugin, build-step bundlers
- Accessibility linters: axe, WAVE
Step-by-step process
- Run audits and list failures by impact and effort.
- Replace heavy images: compress, convert to
WebP, and implementlazy-loading.
- Enable CDN and configure caching headers for static assets.
- Defer or split render-blocking JS, load critical CSS inline, and use code-splitting.
- Fix accessibility gaps: add meaningful alt text, ensure form
labelelements, and verify focus order.
- Re-run audits and iterate on the top three remaining issues.
Practical details and examples
- Image wins: Research from WordPress.org shows that converting hero images to
WebPand resizing to the displayed dimensions often trims 40–70% of payload. - JS strategy: Move non-critical scripts to the bottom or mark them with
defer/async; critical UI code should be inlined sparingly. - Accessibility fixes: Every interactive element must be reachable by keyboard and announce purpose via aria or visible labels.
Measure before changing so rollback is possible and effort is focused on what truly moves metrics. For teams wanting automation in this pipeline, consider integrating an AI content workflow to surface content-specific performance issues; for example, Phased optimization timeline: quick wins vs longer projects Table: Step-by-Step: Optimizing Performance and Accessibility — Task, Estimated Time, Impact (High/Med/Low) & more
| Task | Estimated Time | Impact (High/Med/Low) | Tools |
|---|---|---|---|
| Image compression and WebP conversion | 1–3 hours | High | Squoosh, cwebp, image plugin |
| Enable caching and CDN | 30–90 minutes | High | Cloudflare, Fastly, hosting CDN |
| Defer render-blocking JS | 2–8 hours | High | Bundler (Webpack/Rollup), defer/async |
| Accessibility fixes (alt text, labels) | 1–4 hours | Medium | axe, WAVE, CMS editor |
Key insight: Quick wins like image optimization and CDN setup yield the largest performance improvements with limited developer time, while JS refactoring and full accessibility audits are higher effort but necessary for sustained gains.
Applying this sequence keeps work focused on measurable wins: smaller changes first, then deeper engineering. That approach speeds up visible results and expands reach to more users.
Lightweight micro-plugins for common tasks (email, related posts, sharing)
Table: Step-by-Step: Extending Functionality with Widgets & Micro-Plugins — Feature, Plugin Example, Estimated Impact on Performance & more
| Feature | Plugin Example | Estimated Impact on Performance | Best Use Case |
|---|---|---|---|
| Email Capture | WPForms Lite / Server-post form | Low (minimal JS) | Simple newsletter opt-ins |
| Related Posts | Yet Another Related Posts Plugin | Medium (DB queries) | Content discovery on high-traffic blogs |
| Social Sharing | Lightweight Share Buttons | Very low (SVG + minimal JS) | Social engagement without analytics bloat |
| Table of Contents | Easy Table of Contents | Low (injected HTML) | Long-form posts for navigation |
Key insight: Opt for plugins that perform work server-side or inject minimal HTML/JS. Small savings per plugin compound across a page and keep Core vitals strong. Choose features based on measurable impact, not perceived coolness.
Keeping feature additions surgical preserves performance and user experience while letting the blog evolve. Small, well-measured plugins often deliver more long-term value than big, flashy bundles.
Troubleshooting Common Issues
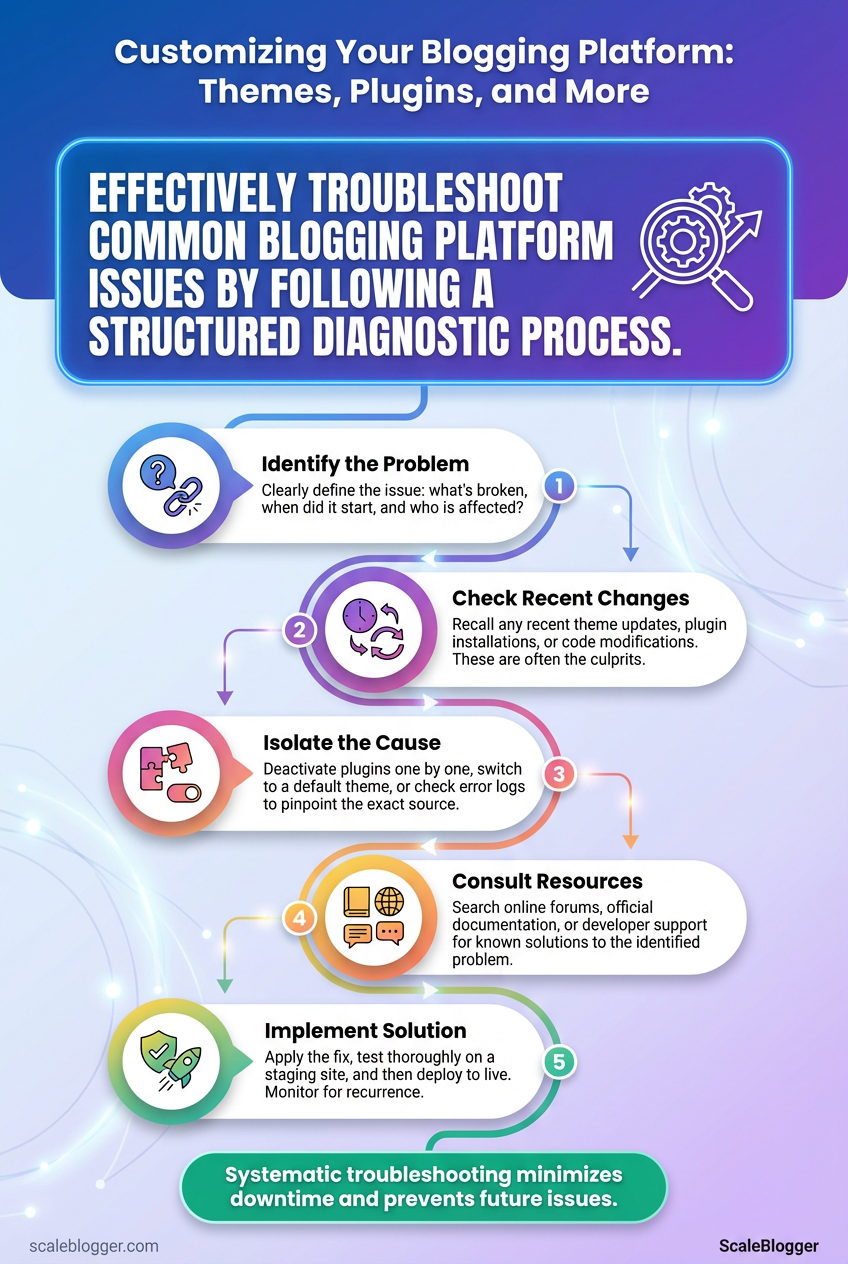
Begin by treating every problem as a simple question: is it a site-level issue or an environment-level one? That split lets you isolate causes quickly and apply fast fixes without chasing irrelevant variables. A quick diagnosis flow plus a small set of commands and file paths will save hours when something breaks.
Binary troubleshooting flow (high-level)
- Check if the problem reproduces in a clean environment (different browser, private window, or staging site). If it appears everywhere, proceed to step 2.
- If the issue is site-specific, disable recent changes (plugins, theme updates). If it’s environment-specific, inspect server, CDN, DNS, and network layers.
Fast commands and file paths to run immediately
1. curl -I https://your-site.com — checks HTTP headers and status.
2. ping your-site.com and traceroute your-site.com — basic network reachability.
- SSH to server, then
toporhtop— look for CPU/memory spikes.
- WordPress-specific: open
wp-config.phpand setdefine('WP_DEBUG', true);then checkwp-content/debug.logfor PHP errors.
- WP-CLI quick rollback:
wp plugin deactivate --all(to test plugin conflicts) andwp theme activate twentytwentyone(to revert theme).
What to collect before contacting a developer
- Error logs: Provide
wp-content/debug.logand servererror.log. - Reproduction steps: Exact clicks and inputs that trigger the issue.
- Browser/dev tools output: Console errors and network waterfall screenshots.
- Environment snapshot: PHP version, MySQL version, active plugins/themes list.
- Recent changes: Any deployments, plugin/theme updates, or server config edits.
Fast Fixes & Diagnosis Flow
Common issue, probable cause, immediate action, long-term fix
Table: Troubleshooting Common Issues — Symptoms, Probable Cause, Immediate Action & more
| Symptoms | Probable Cause | Immediate Action | Long-term Fix |
|---|---|---|---|
| Broken layout | CSS/JS minification or theme update | Clear caches; disable minifier | Rebuild critical CSS; lock tested theme version |
| Plugin conflict | Two plugins hook same filter | Deactivate recent plugins | Stagger updates; use staging tests |
| Slow loading | Uncached queries or large assets | Temporarily enable CDN; gzip assets | Query optimization; image compression; CDN + caching |
| 500 server error | PHP fatal error or memory limit | Check error.log; increase memory_limit | Fix offending code; add monitoring |
| Missing images | Incorrect file paths or permissions | Verify wp-content/uploads and URLs | Implement upload tests; set correct permissions |
Key insight: follow the binary flow, use simple commands to gather reproducible evidence, and prioritize fixes that are reversible and testable.
If repeated troubleshooting points to process gaps (deployments or content workflows), consider automating checks or using tools that monitor plugin health and performance. For teams scaling content operations, Scale your content workflow can help automate checks and reduce repetitive errors. Troubleshooting gets easier when the environment and evidence are predictable—collect the right data and you’ll get fixes deployed with confidence.
Pro Tips & Tips for Success
Think of the blog as a living system: design for maintainability, monitor for observability, and automate repetitive tasks so you can focus on strategy and storytelling.
Version control: Keep all templates, shortcodes, and deployment scripts in git. Monitoring hooks: Expose metrics and logs from publishing pipelines and rendering services. Analytics baseline: Have a reliable analytics view (server-side or GA4) before making design changes.
Focus areas and practical tactics
- Design for maintainability: Refactor reusable components into modular templates so theme updates don’t break pages. Small, isolated templates make A/B tests and redesigns faster and safer.
- Observe everything that affects UX: Track render times, broken assets, and content fetch errors alongside engagement metrics. Correlating load time with bounce rate quickly surfaces expensive UX regressions.
- Automate repetitive ops: Schedule backups, dependency updates, and image optimization in CI rather than by hand. Automation frees time and reduces human error.
- Set up an automated backup pipeline.
- Configure daily snapshots of the content database and weekly full-site exports.
- Push backups to at least two different storage providers and validate restores monthly.
- Add observability to publishing workflows.
- Emit events for
publish,update, androllback.
- Capture latency and failure counts so alerts are actionable.
Practical analytics tactics
- Define a small set of success metrics: Sessions, time on content, scroll depth, and conversion events.
- Use event-level attribution: Tag design changes and deployments so analytics can filter by experiment windows.
- Measure impact of design changes: Run short, controlled experiments and compare cohort behavior rather than relying on single-day swings.
that scale
- Small site: Automate image compression and schedule weekly content audits. Results: lower page weight, faster load times.
- Growing network: Implement feature flags for staged rollouts and instrument each flag with targeted metrics. Results: safer launches, measurable improvements.
Consider using an AI pipeline to speed content ops—tools that auto-suggest tags, rewrite meta descriptions, or batch- images save hours. For teams looking to scale predictably, Scaleblogger.com shows how to automate blog pipelines and benchmark performance against industry patterns.
Take these practices and bake them into your release cadence so design and content changes are measurable, reversible, and low-friction. That’s how small teams move at startup speed without breaking the site.
Conclusion
After walking through prerequisites, theme selection, plugin safety, design tweaks, performance checks and rollback plans, the path forward is straightforward: pick a lean theme, vet plugins on staging, and test every change with real metrics before pushing live. Those moments in the article — the slow theme that tanked load times and the SEO plugin that rewrote meta tags — show why careful testing and a rollback plan are non-negotiable. If a design choice sacrifices speed, prioritize fixes like image optimization and critical CSS; if a plugin misbehaves, isolate it on staging and replace it with a lightweight alternative.
