

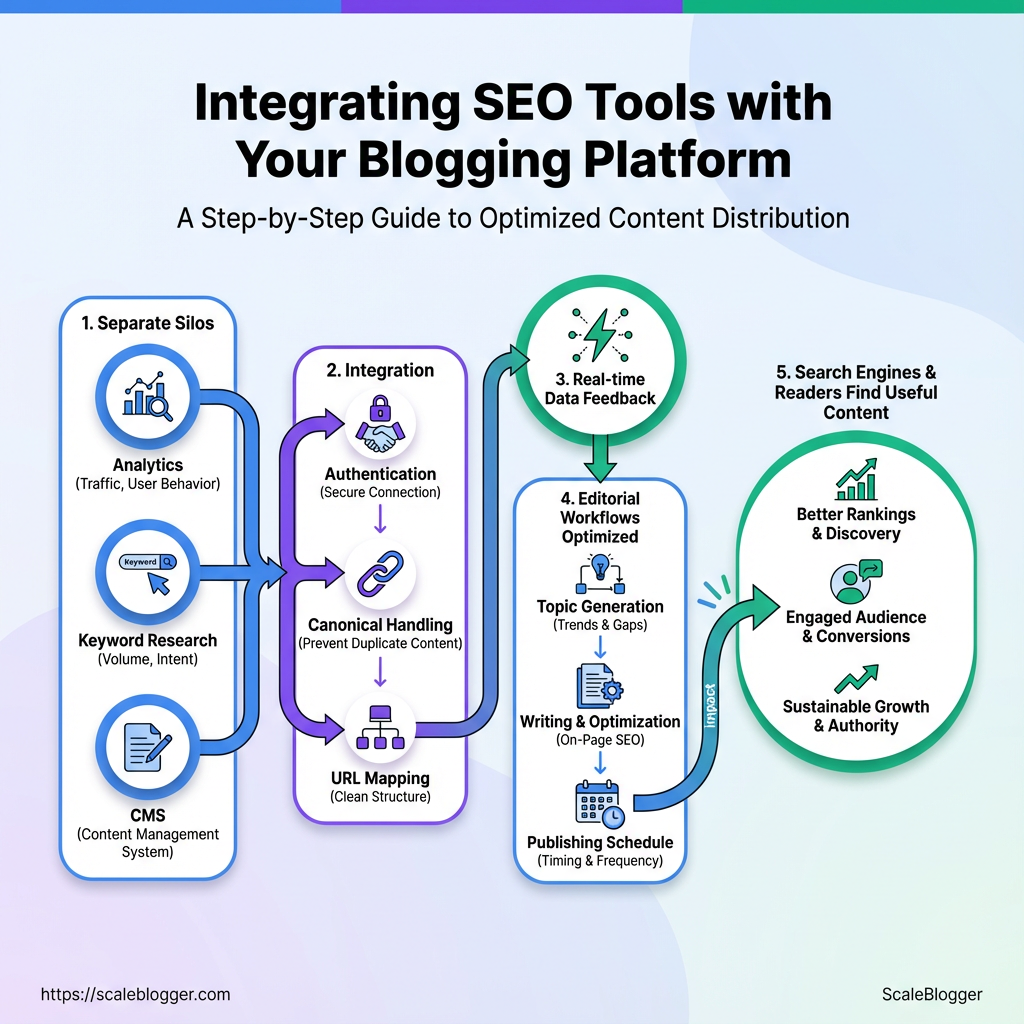
Integrating SEO tools with your blogging platform brings optimization, monitoring, and performance data directly into your publishing workflow.
Instead of switching between disconnected tools, bloggers can use SEO tools integration to manage keyword optimization, technical checks, schema, and performance tracking more efficiently.
The right SEO tools for bloggers can also support SEO workflow automation, helping identify broken links, indexing issues, ranking changes, and optimization opportunities faster.
With a connected system, SEO becomes an ongoing part of content creation rather than something you only think about after publishing.
Prerequisites and What You’ll Need
Gather your essentials before changing SEO settings or adding automation to your blog, ensuring you don’t end up with a long list of problems. At minimum, gather access, accounts, and a fallback plan before making edits. This prevents permission issues, maintains analytics accuracy, and simplifies rollbacks if a change causes problems.
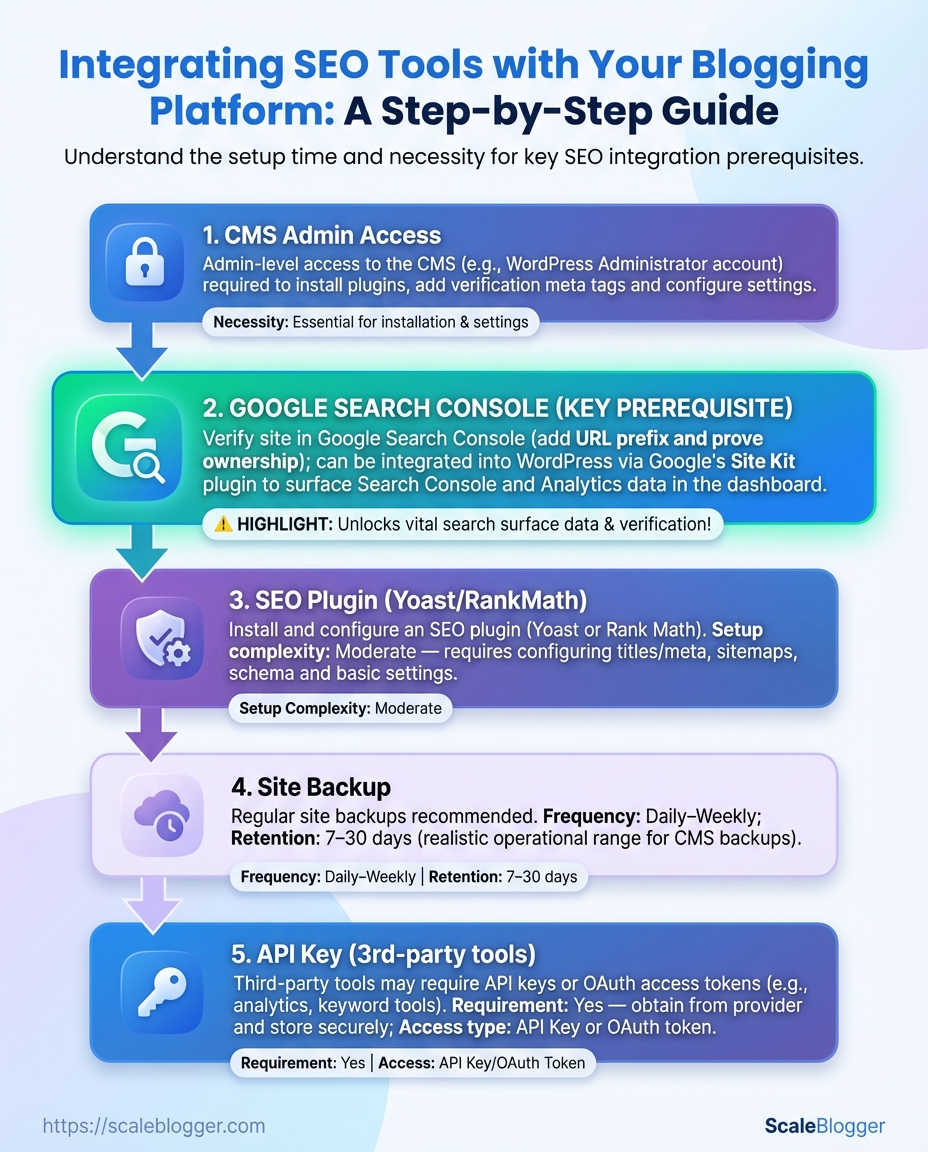
- Admin-level access to the CMS: Allows plugin installs, sitemap edits, and user-permission checks without waiting on IT.
- Accounts for primary SEO tools and analytics: Create or confirm access to Google Search Console and a site analytics property (GA4 or equivalent), plus at least one SEO tool account (e.g., Yoast, RankMath, SEMrush, Ahrefs).
- Site backup plan: Full site backup (files + database) stored offsite before any configuration or plugin changes.
- API keys for third-party tools: Obtain
API keycredentials for any automation platforms or SEO APIs you plan to use. - Time estimate and difficulty level: Budget 30–90 minutes for setup if everything’s in place; 2–4 hours if you need to request access or configure multiple integrations.
Quick setup steps (practical order)
- Request or confirm Admin access to the CMS and verify plugin installation permissions.
- Create or confirm ownership of Google Search Console and set up the preferred domain properties.
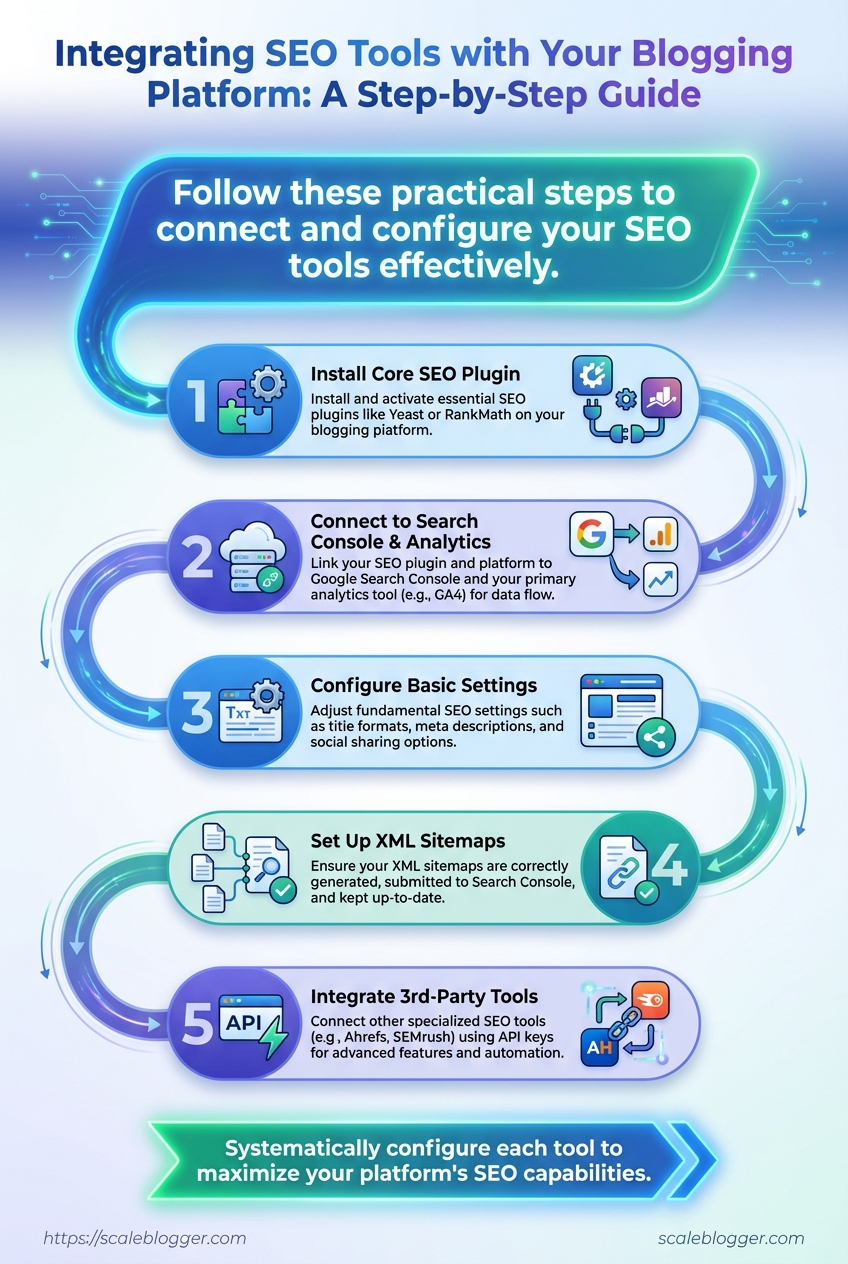
- Install and configure an SEO plugin like Yoast or RankMath; connect it to Search Console and your analytics.
- Run a site backup, then store the backup offsite (cloud storage or managed host snapshot).
- Add any necessary API keys to the integrations panel and test calls.
Tools to have on hand: a password manager, site backup plugin or host snapshot feature, and access to a cloud storage account.
Required vs optional prerequisites and which platforms require them
Table: Prerequisites and What You’ll Need — Item, Required/Optional, Why it’s needed & more
| Item | Required/Optional | Why it’s needed | Typical time to set up |
|---|---|---|---|
| CMS Admin Access | Required | Install plugins, edit themes, manage redirects | 5–30 minutes (request time varies) |
| Google Search Console | Required | Indexing, performance data, sitemap submission | 10–20 minutes |
| SEO Plugin (Yoast/RankMath) | Required (WordPress), Optional (Ghost/Shopify) | On-page SEO controls, sitemaps, metadata | 15–45 minutes |
| Site Backup | Required | Safe rollback point before changes | 5–30 minutes (depends on host) |
| API Key (3rd-party tools) | Optional (required for automation) | Connect automation, fetch keyword data | 5–20 minutes |
Most setups hinge on admin access and Search Console. If those two are ready, the remaining steps are quick—installing an SEO plugin and creating backups usually take the longest. Prioritize a verified backup and Search Console ownership before granting any automation tool API access.
A little prep saves a lot of frustration later: get permissions sorted, lock in backups, and confirm analytics ownership before touching site-wide settings. That way changes are deliberate, measurable, and reversible.
Audit Your Current SEO Setup
Begin the audit like a diagnostic: note where your site currently ranks, how Google views it, and what technical issues affect its performance. Combine checks from Search Console, Analytics, a complete site crawl, and manual inspections of your sitemap and robots configuration for a thorough audit. That gives a repeatable snapshot to measure improvements against.
Access to Google Search Console: Ensure property verified and you can view Index Coverage and Performance.
Analytics access: GA4 (or Universal) with at least 30 days of data for traffic trends.
Crawl tool license: Screaming Frog, Sitebulb, or equivalent.
Tools & materials
- Search Console: index coverage, URL inspection, performance.
- Analytics (GA4): traffic, top pages, engagement metrics.
- Crawl tool: identify broken links, duplicate metadata, redirect chains.
- Browser devtools / Lighthouse: mobile usability and page speed.
- A copy of
sitemap.xmlandrobots.txt.
- Run Search Console checks: export Index Coverage, review excluded vs valid URLs, and note any
server errororindexed but blockedmessages.
- Pull Performance report: capture clicks, impressions, average CTR, and position for the last 90 days. Flag pages with high impressions but low CTR.
- Crawl the site with Screaming Frog (or similar) and export findings for:
- duplicate title tags
- duplicate meta descriptions
- 4xx and 5xx status codes
- redirect chains and hreflang issues
- Run Lighthouse on a sample of page templates to capture LCP, CLS, and TTI. Prioritize pages with the highest traffic.
- Check
sitemap.xmlandrobots.txt: confirm sitemap is registered in Search Console androbots.txtisn’t blocking important sections.
Common quick wins: fix 4xx pages, consolidate duplicate metadata, remove long redirect chains, and prioritize mobile usability fixes.
Baseline metrics to record during the initial audit
Table: Audit Your Current SEO Setup — Metric, Tool to use, How to check (steps) & more
| Metric | Tool to use | How to check (steps) | Acceptable threshold |
|---|---|---|---|
| Index coverage | Google Search Console | Open Coverage report → Export list of errors/warnings → Inspect sample URLs | ≥95% of canonical pages valid |
| Mobile usability issues | Google Search Console Mobile Usability / Lighthouse | Mobile Usability report → Run Lighthouse mobile audit → Note issues per page | 0 critical issues; ≤5 non-critical per 100 pages |
| Average page speed (LCP/CLS/TTI) | Lighthouse / PageSpeed Insights | Run Lighthouse → Record LCP, CLS, TTI for templates → Aggregate averages | LCP ≤2.5s; CLS ≤0.1; TTI reasonable per site |
| Number of 4xx/5xx errors | Screaming Frog / Server logs | Crawl site → Filter 4xx/5xx → Prioritize fixes by traffic impact | 0 high-traffic 4xx/5xx; overall errors minimal |
| Duplicate title/meta descriptions | Screaming Frog | Crawl → Export duplicates → Map to templates | ≤2% pages with duplicates |
This table shows the minimum metrics to capture so the audit is actionable and repeatable; track these monthly to see real progress.
If automation is part of the plan, an AI-powered content pipeline like Scaleblogger.com can help turn audit findings into prioritized editorial work. Running this baseline gives a defensible starting point for fixing technical debt and aligning content to search intent.
Choose the Right SEO Tools and Plugins
Picking the right toolkit starts by matching capabilities to the job: audits, keyword research, schema, or automation. Focus on tools that integrate with your CMS, expose an API if you plan to automate, and fit the support and budget constraints of your team. A small set of complementary tools usually beats a dozen overlapping subscriptions.
Practical selection steps
- Identify needs and priorities.
- Audit and technical SEO
- Keyword research and content gaps
- Schema and structured data
- Automation / API-driven workflows
- Match tool capabilities.
- Prefer plugins with native CMS integration for daily ops.
- Reserve heavy desktop tools for periodic deep audits.
- Choose API-enabled platforms if you’ll automate content scoring or reporting.
- Validate cost, support, and extensibility.
- Check pricing tiers and seat limits.
- Confirm SLA, community activity, and documentation.
- Test sandbox or free tiers before committing.
Audit scope: Clear list of technical checks and target pages.
Automation plan: Whether you’ll use API calls or manual export/import.
CMS details: Version, hosting type, and plugin compatibility.
Side-by-side comparison of recommended tools and when to use each
Table: Choose the Right SEO Tools and Plugins — Tool, Primary Function, Best for & more
| Tool | Primary Function | Best for | Cost estimate |
|---|---|---|---|
| Yoast / Rank Math | On-page SEO, meta templates, sitemap | CMS-native on-page optimization | Free; premium $49–$199/yr |
| Semrush / Ahrefs | Keyword research, competitive analysis | Content strategy & keyword gaps | $119–$399/mo typical |
| Screaming Frog | Site crawling, technical audits | Deep technical SEO audits | Free limited; £149/yr license |
| Google Search Console | Indexing, performance reports | Monitoring site presence & errors | Free |
| Schema plugin / JSON-LD tool | Structured data generation | Adding schema for rich snippets | Free to $99/yr depending on plugin |
Key insight: This mix covers day-to-day on-page needs (Yoast/Rank Math), strategic research (Semrush/Ahrefs), deep technical checks (Screaming Frog), and continuous monitoring (Google Search Console). Schema helpers close the loop for rich results.
What to watch for: if automating, confirm the platform offers a stable REST API and reasonable rate limits. If the team is small, favor plugins that reduce manual work inside the CMS. For scaling content operations and adding AI-driven workflows, consider integrating an automation partner like Scale your content workflow to bridge research, publishing, and performance tracking.
Choose tools that reduce friction for your actual process — tools should enable the work, not create more moving parts.
Key Takeaway: Connecting your content systems is where your strategy begins to work effectively. Begin by mapping which tools will exchange data, then wire them together one connection at a time.
Connect and Configure the Tools (Numbered Steps)
Connecting your content systems is where your strategy begins to work effectively. Begin by mapping which tools will exchange data, then wire them together one connection at a time. Keep each integration small and testable: connect the CMS to the content source, the content source to the editor/review workflow, and finally the CMS to analytics/publishing.
That sequence avoids tangled failures and makes troubleshooting straightforward. Below are the concrete, numbered steps to follow — each step lists platform-specific actions for WordPress and generic CMSs, calls out where screenshots or diagrams are needed, and gives time and difficulty estimates.
Tools & materials
- Content source: Google Docs, Airtable, or an editorial database
- CMS: WordPress or generic CMS with REST API access
- Automation layer: Zapier, Make, or an internal webhook/worker
- Editor/workflow: Editorial calendar tool or your review board
- Analytics: Google Analytics / GA4 or server-side tracking
- Inventory existing endpoints and credentials.
Expected time: 20–45 minutes. Difficulty: Easy.
- WordPress: Verify REST API access at
https://your-site.com/wp-json/and confirm an application password or OAuth token. - Generic CMS: Confirm API base URL and that an API key or client credentials are available.
- Take screenshots of API settings and token pages for secure records.
- Create a staging environment and a dedicated integration user.
Expected time: 30–60 minutes. Difficulty: Medium.
- WordPress: Create a staging site or use a staging plugin; add a user with
Editorrole and an application password. - Generic CMS: Provision a staging tenant or sandbox and create an API user with restricted scopes.
- Diagram the data flow between systems (authoring → review → publish).
- Connect the authoring source to the workflow engine.
Expected time: 45–90 minutes. Difficulty: Medium.
- Use
Zapier/Maketo watch for new rows/docs and create a draft in the editorial tool. - Map fields: title → title, body → content, tags → taxonomy.
- Include a screenshot of the field mapping screen.
- Configure CMS draft ingestion and metadata sync.
Expected time: 30–75 minutes. Difficulty: Medium–Hard.
- WordPress: POST drafts to
/wp-json/wp/v2/postswithstatus=draft; sync custom fields viameta. - Generic CMS: Use the publish endpoint, setting
state=draftand mapping custom taxonomies. - Validate by creating a test draft and capturing logs.
- Wire publishing triggers and asset uploads.
Expected time: 20–60 minutes. Difficulty: Medium.
- Set a webhook from the workflow to the CMS to change
statustopublishon approval. - Ensure images are uploaded to the CMS media endpoint and linked in content; show a screenshot of a successful media upload response.
- Integrate analytics and SEO checks.
Expected time: 30–60 minutes. Difficulty: Medium.
- Add GA4 measurement IDs or server-side tracking endpoints to the CMS templates.
- Run an SEO validation step (title length, meta description) via an automation rule before publish.
- Run a full end-to-end test and document the flow.
Expected time: 45–90 minutes. Difficulty: Medium.
- Execute a test from draft creation through publish, capture screenshots of each stage, and log API responses for future debugging.
- Store the integration diagram and test checklist in a shared repo.
Common checks while configuring: confirm timezones, verify media size limits, and validate taxonomy consistency. If automation will be a long-term part of the stack, consider recording the configuration steps and storing them with your deployment artifacts. For teams that want to accelerate this setup, Scaleblogger.com offers services to automate content pipelines and standardize these integrations for repeatable, measurable publishing.
Done correctly, the integrations make content flow predictably and free up time for quality work — which is the whole point.
Key Takeaway: Automating SEO workflows changes repetitive tasks into predictable and measurable systems. First, identify repeatable tasks, like rank checks, audits, and schema validation.
Automate and Scale Your SEO Workflows
Automating SEO workflows changes repetitive tasks into predictable and measurable systems. First, identify repeatable tasks, like rank checks, audits, and schema validation. Then create automation recipes that run based on events or schedules. Effective automations reduce human error, free up time for strategy, and keep content signals relevant without constant manual efforts.
Common automation patterns to adopt
- Event-triggered publishing: Run a pre-publish SEO audit when a draft moves to
publish. Scheduled monitoring: Run rank and crawl checks on fixed cadences to catch regressions early. Alerting + ticketing: Create tickets automatically for broken links or schema errors.
- Content scoring pipeline: Push new drafts through an automated content-score and send low-scoring items back for revision.
Recommended scheduling cadence for different automation tasks
Table: Automate and Scale Your SEO Workflows — Task, Recommended Frequency, Tools to use & more
| Task | Recommended Frequency | Tools to use | Estimated setup time |
|---|---|---|---|
| Full site crawl | Weekly | Screaming Frog + SFTP reports or DeepCrawl | 2–4 hours |
| Keyword rank checks | Daily (top 50) / Weekly (long tail) | SEMrush, Ahrefs, or Google Search Console API | 1–2 hours |
| Broken link report | Weekly | Screaming Frog, Ahrefs, Zapier webhook → Jira | 1–2 hours |
| New post SEO audit | On publish | GitHub Actions or Zapier → Site audit tool → Slack | 30–60 minutes |
| Schema validation | On deploy / Weekly | Google Rich Results Test API + Make | 1–2 hours |
Key insight: These cadences keep signal-to-noise low — daily rank checks for high-value keywords, weekly full crawls to spot structural issues, and event-based audits that stop bad content before it goes live.
Tool-specific setup notes and recipes
- Connect content source to automation.
- Use a webhook from the CMS (e.g.,
onPublishwebhook) to trigger an audit.
- If the CMS lacks webhooks, poll with a scheduled Zapier or Make scenario.
- Build the audit chain.
- Pull content via API, run it through an SEO checker (readability, metadata, schema).
- Send results to Slack and create a Jira/Trello card for failures.
- Schedule and monitor.
- Use cron-based schedules in Make or Zapier for routine jobs.
- Add exponential backoff and retry logic to avoid rate-limit issues.
How automation reduces manual maintenance
- Consistency: Automated audits run the same checks every time.
- Speed: Failures surface immediately, cutting mean time to fix.
- Scalability: One pipeline handles 10 posts or 10,000 with the same effort.
For teams looking to plug into an existing AI content pipeline, Scale your content workflow provides ready-built connectors for publishing, audits, and performance benchmarking. Automate the boring work and watch capacity shift from upkeep to growth — you’ll spend less time firefighting and more time improving search share.
Key Takeaway: Start by proving the integration works under real conditions, then keep an eye on it continuously. Run validation checks to confirm data accuracy, performance, and user experience.
Validate, Test, and Monitor Post-Integration
Start by proving the integration works under real conditions, then keep an eye on it continuously. Run validation checks to confirm data accuracy, performance, and user experience. Then set a monitoring baseline so any regressions can be caught quickly. Practical testing reduces surprises for readers and stakeholders, and gives the team signals for when to iterate or roll back.
Post-integration testing checklist
- Data integrity: Verify field-level mappings, no truncated or mis-typed content, and timestamp consistency.
- End-to-end flow: Confirm a content item created in the source system appears as expected on the site and preserves metadata.
- Performance: Measure publish latency and page render time under typical and peak loads.
- Authorization & access: Ensure API keys, roles, and tokens only allow intended operations.
- SEO signals: Check canonical tags, robots directives, and structured data are still present after transformation.
- Error handling: Simulate upstream failures and confirm retries, alerts, and dead-letter handling behave as designed.
Step-by-step validation process
- Run a dry import of 10 representative content items (
draft,published,with images) and compare fields programmatically.
- Open the imported pages in a browser and inspect DOM for
canonical,meta description, and main heading correctness.
- Execute a load test focused on publish endpoints to confirm 95th percentile latency stays within SLA.
- Trigger permissioned actions (edit, delete) to confirm RBAC rules and audit logs are correct.
- Validate analytics tags and sitemap updates; confirm crawlable URLs appear in the sitemap within one publish cycle.
How to read and act on validation output
- Failed mapping rows: Inspect source payload, fix transformation rules, re-run affected items.
- High latency spikes: Pinpoint the bottleneck—network, template rendering, or DB—and push a targeted fix.
- SEO regressions: Reapply structured data or canonical logic and rerun the affected pages through the indexer.
Setting up dashboards for continuous monitoring
- Traffic & crawl health: Track organic landing pages and crawl errors.
- Publish pipeline health: Monitor success rates, queue depth, and retry counts.
- Quality signals: Surface missing metadata, image alt-text gaps, and content scoring drops.
When to roll back changes
- If publish success rate drops below an acceptable threshold for more than one hour.
- If critical metadata (canonical, hreflang) is missing on >5% of pages.
- If rollback restores normal behavior faster than incremental fixes allow.
Consider using automation to pause deployments when key metrics break. A disciplined validate-test-monitor loop keeps integrations stable and prevents tiny issues from becoming content crises.
Troubleshooting Common Issues
Quickly isolate the symptom: reproduce the problem, note recent changes, and capture timestamps. Quick diagnostics help avoid unnecessary searches. Start with what you can observe, such as logs, HTTP responses, and analytics spikes, to find likely causes. Then make small, reversible fixes to test your ideas.
Access to logs: Read/write access to server/app logs and Search Console/Analytics. Rollback plan: A way to revert recent deployments or config changes. Test environment: Staging site or a feature-flagged copy for safe validation.
Common diagnostic checklist
- Reproduce: Confirm the issue on staging or in an incognito browser. Scope: Check whether the problem affects a URL pattern, template, or the whole site. Timebox: Spend 10–20 minutes on root-cause candidates before escalating.
- Document: Record steps tried and their outcomes.
Step-by-step remediation (safe testing)
- Identify the failing component (e.g., sitemap, metadata, schema, tracking).
- Run a lightweight test such as
curl -I https://example.com/sitemap.xmlto confirm HTTP status and headers.
- Apply a minimal change (unminified template, clear cache) on staging.
- Validate the change with the same test and from an external tool (Search Console URL inspection or tag assistant).
- Deploy to production behind a feature flag or during low traffic hours if all checks pass.
When to escalate
- Persistent errors after rollback: Escalate to developers or the vendor.
- API rate limit/external integration issues: Contact the provider if retries and backoff fail.
- Security or data loss signs: Stop deployments and involve SRE/security immediately.
Map symptoms to probable causes and immediate fixes
Table: Troubleshooting Common Issues — Symptom, Probable Cause, Immediate Fix & more
| Symptom | Probable Cause | Immediate Fix | When to escalate |
|---|---|---|---|
| Sitemap not found by Search Console | Sitemap URL blocked by robots.txt or 404 | Verify robots.txt, submit sitemap via Search Console | After fixing URL, escalate if Search Console still rejects |
| Duplicate metadata across pages | Template rendering bug or CMS field misused | Edit template to use page-specific fields; clear cache | If CMS change required, involve devs |
| Schema rich result not showing | Invalid/misplaced JSON-LD or missing required fields | Use structured data testing, correct JSON-LD placement | If valid but not indexed, escalate to platform/vendor |
| Tracking discrepancies in Analytics | Tag duplication, filters, or sampling | Check tag manager, remove duplicate tags, compare gtm.js loads | Escalate to analytics engineer for complex filter issues |
| API rate limit exceeded | High crawl rate or background job spikes | Implement backoff, throttle requests, monitor retry logic | If limits persist, contact API provider support |
Key insight: The most effective fixes are the smallest reversible changes that prove or disprove a hypothesis quickly. Keeping a testable rollback and clear logs shortens mean-time-to-resolution and prevents cascading regressions.
If the issue recurs or you want to automate detection and remediation, consider integrating monitored workflows or an AI-powered content pipeline—Scaleblogger offers automation that flags content and publishing anomalies. Troubleshooting is less about heroic fixes and more about repeatable, observable steps that limit risk and restore steady traffic.
Prioritize KPIs by blog maturity stage
Table: Measuring Success and Iterating — KPI, Starter focus, Growth focus & more
| KPI | Starter focus | Growth focus | Scale focus |
|---|---|---|---|
| Impressions & Clicks | Monitor impressions; aim for topic coverage | titles; CTR target 2–5% | Use personalization; CTR 5%+ |
| Organic Sessions | Track sessions from top 20 pages | Expand topic clusters; +10–30% QoQ | Scale traffic 2x year-over-year |
| Avg. Position | Target top-50 for priority keywords | Push to top-20 via on-page SEO | Top-3 for priority pillars |
| Core Web Vitals | Baseline LCP/CLS; keep errors low | Fix high-impact pages first | Maintain <2.5s LCP, CLS <0.1 |
| Indexed Pages | Ensure key pages indexed | 80% of published posts indexed | Full index coverage & sitemap health |
Key insight: The table aligns metrics and targets to where a blog typically is. Early-stage work is about indexing and reach, growth focuses on CTR and sessions, while scale requires sustained technical health and top-SERP positions.
For teams that want to automate reporting and link performance to content production, consider integrating an AI pipeline that tags content by intent and surface-level performance — tools like Scaleblogger.com help tie publishing cadence to measurable outcomes. Iteration that’s both frequent and small beats infrequent big rewrites; measure, change one variable, and re-measure so improvements compound predictably.
Conclusion
If the site audit, plugin choices, workflow wiring, and monitoring steps landed as practical moves rather than theory, the path forward is simple: run the SEO audit this week, pick the tools that integrate with your CMS, and automate the repetitive tasks you dread. The article showed how a focused audit surfaces the biggest opportunities, how choosing the right SEO tools for bloggers keeps keyword and metadata work centralized, and how automating tag updates and sitemap submissions speeds indexation. Worried about breaking something during integration?
Start on a staging site and test a single automated job first. Unsure which plugin plays nicely with your platform or how deep SEO integration needs to go? Aim for the smallest change that delivers measurable traffic uplift.
For a clear next step, map one routine task you can hand off to automation, schedule 60–90 minutes to configure it, and monitor results for two publishing cycles. For teams looking to that process, platforms exist that stitch analytics, keyword research, and CMS actions into a single flow — for example, consider exploring Automate your blog’s SEO with Scaleblogger as one option to speed setup and reduce manual work.
