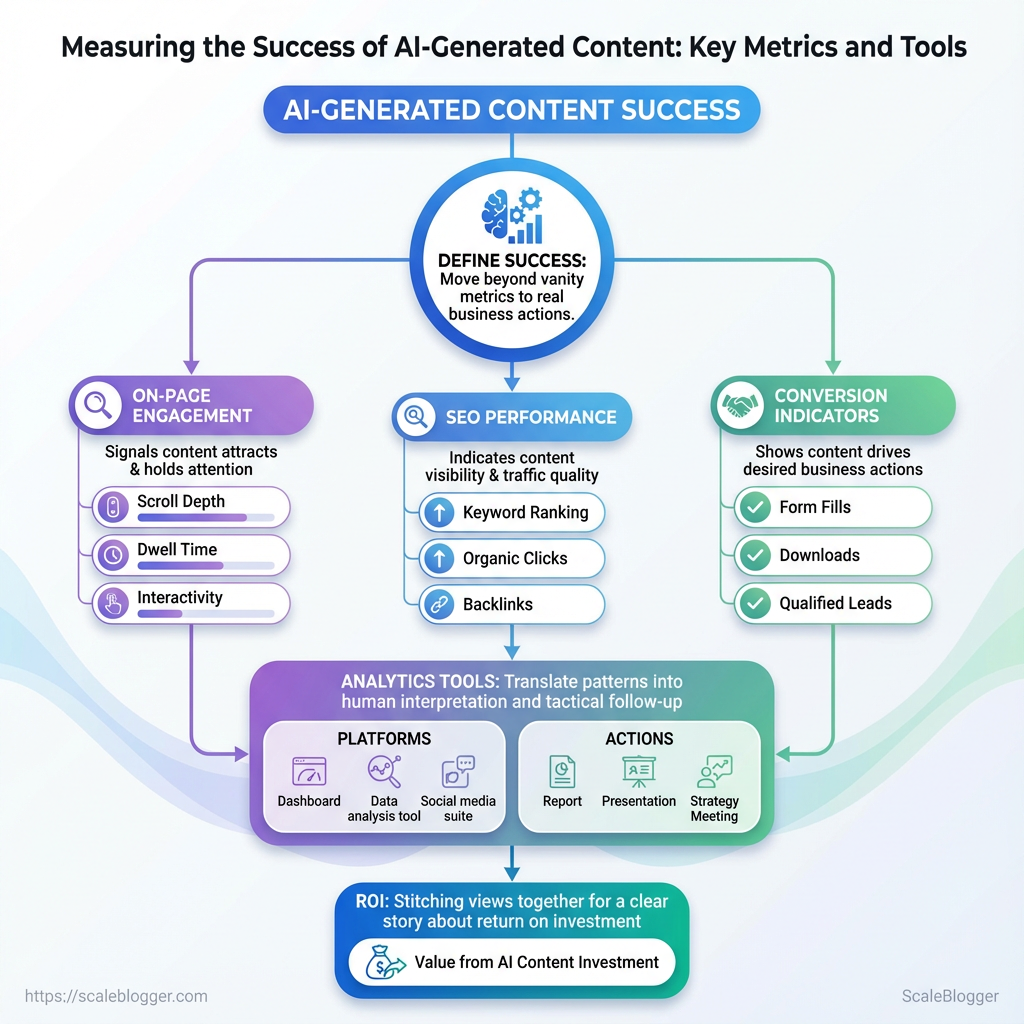
Most teams can produce AI drafts faster than they can agree on how to judge them, and that gap is where wasted effort hides. If an article ranks but never converts, or if traffic spikes without sustained engagement, the problem is rarely the model — it’s the way success gets defined and measured with AI content metrics.
Good measurement blends outcome and process: you need signals that show whether content attracts the right traffic, holds attention, and drives business actions, not vanity numbers that feel good on a dashboard. Choosing the right mix of on-page engagement, SEO performance, and conversion indicators turns fuzzy judgment into repeatable decisions about quality and scale, which is the heart of effective content success measurement.
Picking tools follows naturally from the metrics you value: some platforms excel at search visibility and keyword tracking, others surface reader behavior and funnel events, and a few stitch those views together into a clear story about ROI. Treat analytics tools as translators, not arbiters — they reveal patterns that demand human interpretation and tactical follow-up.
What You’ll Need (Prerequisites)
Start with the tools, access, and baseline data already in place — that’s what makes measuring AI-driven content changes reliable instead of noisy. Aim to have analytics and search access, CMS control, a repeatable UTM convention, and a 30–90 day historical window of performance so lifts or drops after launching AI content are attributable and measurable. Also make sure the team knows how to export CSVs, filter queries, and read basic A/B results.
Core checklist — accounts and access:
- GA4 account: view and edit access to the property that tracks your site
- Google Search Console: ownership or verified user for the relevant site
- CMS admin access: ability to publish, edit, and rollback posts
- UTM tracking standard: consistent
utm_source,utm_medium,utm_campaignrules - Data export permissions: ability to download CSVs or connect to BI tools
- A/B testing platform: e.g., Optimizely, Google Optimize successor, or internal experimentation tool
- Content inventory spreadsheet: living file with URLs, topics, publish dates, and tags
- AI tool logs: exportable history of prompts/outputs and deployment timestamps
Baseline data window: At least 30 days of pre-launch data, ideally 60–90 days for seasonality smoothing.
Skills required: Comfort filtering query strings, setting UTM parameters, running CSV exports, and interpreting simple cohort charts.
Help readers quickly assess which prerequisites they already have and which they need to set up
| Prerequisite | Why it’s needed | Minimum required | Time to set up |
|---|---|---|---|
| Google Analytics 4 (GA4) | Measures pageviews, engagement, conversions | Property with GA4 tag on site |
1–3 hours (tagging + config) |
| Google Search Console | Tracks search impressions, queries, index status | Verified site property | 15–60 minutes |
| Content Management System (CMS) access | Publish/rollback content and add tracking snippets | Admin or Editor role | 10–30 minutes (request) |
| UTM tracking standard | Consistent campaign attribution for experiments | Documented utm naming conventions |
30–90 minutes to write + rollout |
| Data export permissions | Enables CSV exports or API access for analysis | Export or API credentials | 30–120 minutes (depends on admins) |
Key insight: These five items cover where numbers come from and who can act on them. Without GA4 and Search Console, attribution is guesswork. Without CMS access and UTM standards, experiments become non-repeatable. Aim to clear any permission blockers before publishing the first AI-assisted piece.
If the team needs a smoother way to automate tracking and publishing, consider integrating an AI content pipeline that centralizes UTM rules and stores AI tool logs — that reduces friction and preserves traceability as you scale. Having this foundation in place makes the next steps — designing experiments and interpreting AI content metrics — far more productive.
Define Success: KPIs & Metrics for AI-Generated Content
Start by picking a small set of measurable goals that map directly to business outcomes—visibility, engagement, or revenue—and then assign one primary KPI and one or two secondary KPIs to each goal. Choose metrics you can trust from your analytics stack, define their exact calculations, and set time-bound targets: short-term (30–90 days) for iteration and long-term (6–12 months) for strategy validation. Use quality proxies—returning users, scroll depth, and manual quality audits—to catch issues that raw traffic numbers miss.
Primary vs Secondary KPI mapping
- Map business goal to KPI family (visibility → acquisition; engagement → behavior; revenue → conversions).
- Define exact metric calculations:
Organic Sessions= sessions wheremedium == organicin GA4.Organic CTR= clicks / impressions from Google Search Console, measured per page or query.Conversion Rate= conversions / sessions (set conversion = newsletter signup, lead form, or ecommerce checkouts).- Assign primary KPI (one per goal) and 1–2 secondary KPIs that explain the “why” behind movement.
Short-term vs long-term targets
- Short-term (30–90 days): realistic, improvement-focused (e.g., +10–25% organic sessions, +2–4pp CTR).
- Long-term (6–12 months): business-level growth (e.g., doubling organic sessions, +20–30% conversion rate uplift from content funnel improvements).
Quality proxies and manual signals
- Returning users: proxy for relevance and retention.
- Scroll depth / engaged sessions: proxy for content usefulness.
- Manual quality audits: editorial checklist scoring on factual accuracy, originality, and search intent fit.
Definitions
Primary KPI: The single metric used to decide whether a campaign succeeded against its main business goal.
Secondary KPI: Supporting metrics that explain movement in the primary KPI or highlight side effects.
Quality proxy: Behavioral or manual signals used to approximate content value beyond raw traffic.
KPI options (what they measure, data source, pros/cons, ideal use-case)
| KPI | What it measures | Primary data source | Best for (goal) |
|---|---|---|---|
| Organic Sessions | Volume of search-driven visits | GA4 | Visibility/growth |
| Organic CTR | Relevance of title/snippet to queries | Google Search Console | SERP optimization |
| Time on Page / Engaged Sessions | How long users interact with content | CMS analytics / GA4 engaged sessions | Content engagement |
| Conversion Rate | Rate of goal completion per session | GA4 / CMS form events | Revenue or lead generation |
| Content Quality Score (manual) | Editorial quality, accuracy, intent match | Internal QA rubrics | Editorial control / brand safety |
Key insight: Pick KPIs that align with a single business outcome, instrument them reliably in GA4 and Search Console, and pair behavioral proxies with manual audits to surface quality issues that traffic numbers hide. Tools like Scaleblogger.com can help automate scoring and benchmark performance across campaigns.
Choosing the right KPIs keeps experiments focused and measurable, and combining behavioral proxies with manual checks reduces the risk of optimizing for the wrong signals. Keep targets modest at first, learn quickly, then scale what’s working.
Set Up Tracking: Instrumentation & Tagging
Start by treating tracking as part of the content itself: instrument pages and distribution links so every piece of AI-assisted content carries metadata that answers “which model, which campaign, and which version.” That makes evaluation and rollback decisions possible instead of guesswork.
Access to GA4: Admin-level permissions to create custom dimensions and view debug data.
Google Tag Manager (GTM): Container published with preview access for testing.
CMS templates editable: Ability to inject UTM parameters and meta tags into templates.
What to instrument and why
- Create a UTM naming convention that’s strict and predictable.
- Push GA4 events for user interactions you care about.
- Add lightweight AI attribution tags as custom dimensions so content origin is queryable.
- Use GTM to map page-level dataLayer variables into GA4 event parameters.
- Create GA4 custom dimensions for
content_type,ai_generated, andmodel_version. - Test via GA4 DebugView and GTM Preview before publishing changes.
Practical rules for UTM naming Use utm_source for where the click originates (example: newsletter, twitter). Use utm_medium for the channel type (example: email, social). * Use utm_campaign for the initiative name (example: spring_launch_v2).
Event priorities Scroll depth: capture 25/50/75/100 percent markers as scroll_depth events. CTA clicks: fire cta_click with cta_id and page_type. * Form submits: fire form_submit with form_name and success boolean.
AI attribution fields content_type: e.g., blog_post, newsletter, landing_page.
ai_generated: true or false to flag machine-assisted content.
model_version: e.g., gpt-4o-2025-03 to track which model produced the draft.
Recommended tracking fields, example values, where to configure them (GA4, Tag Manager, CMS)
| Field | Example Value | Configuration Location | Purpose |
|---|---|---|---|
| utm_source | newsletter_weekly |
CMS link templates / email builder | Identify originating channel |
| utm_medium | email |
CMS link templates / email builder | Categorize channel type |
| content_type | blog_post |
GA4 custom dimension (via GTM) | Classify content format |
| ai_generated | true |
GA4 custom dimension (via GTM) | Flag AI-assisted content |
| model_version | gpt-4o-2025-03 |
GA4 custom dimension (via GTM) | Track model provenance |
Brief analysis: These fields let you slice performance by channel, content format, and whether AI was involved. Mapping them through GTM keeps page templates clean and centralizes changes. Once captured in GA4, creating audiences or explorations for AI-generated content becomes straightforward and repeatable.
Testing matters: publish to a staging property, use GTM Preview and GA4 DebugView to validate event payloads and custom dimension mapping. Instrumentation done this way turns messy attribution into a dataset you can optimize against, not guesswork. For a streamlined content pipeline that automatically injects these tags, consider integrating with an automation provider like Scaleblogger.com. Instrument once correctly and the analytics work for you every time.
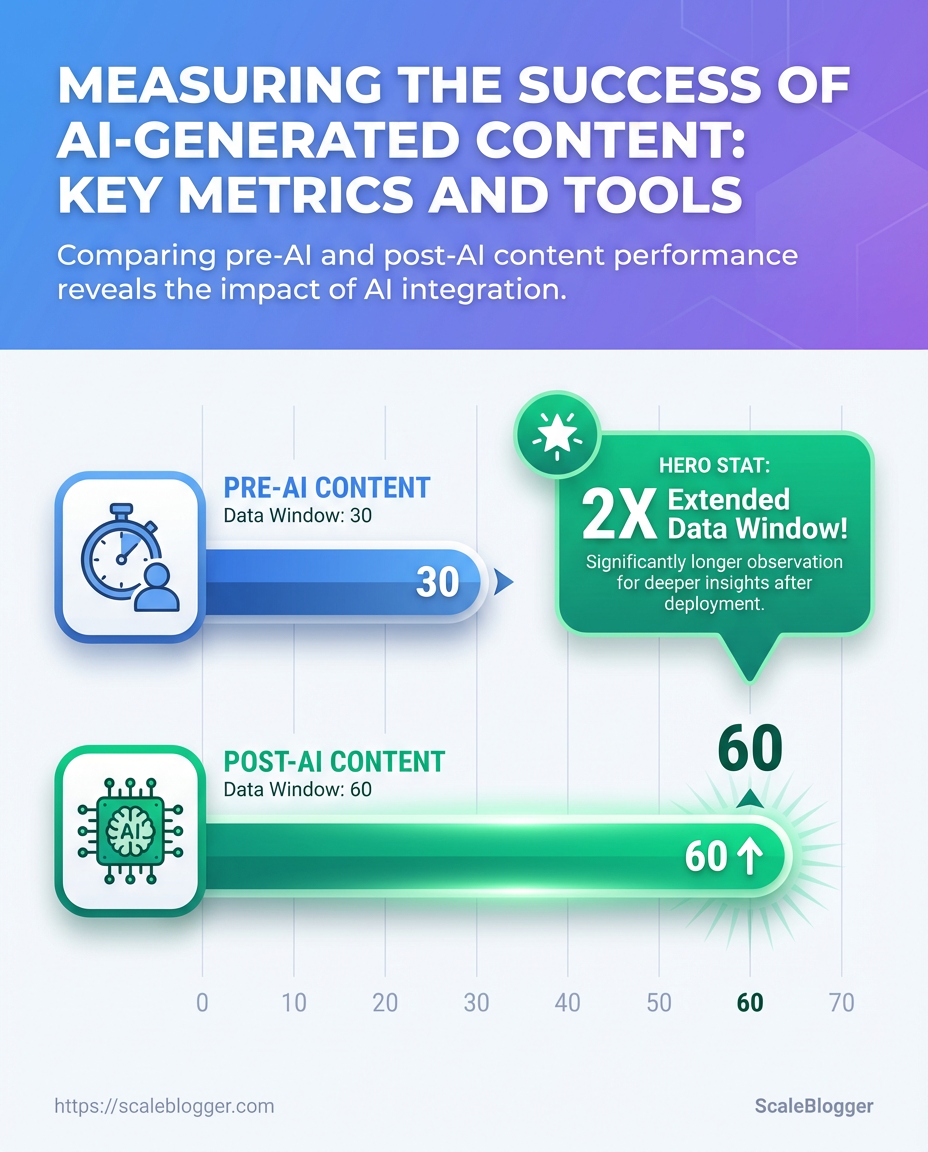
Baseline Analysis: Measuring pre-AI vs post-AI Performance
Start by treating the pre-AI period as a true control and the post-AI rollout as the treatment. Define cohorts precisely, normalize for seasonality and external events, then use statistical tests and minimum-sample rules so changes aren’t noise. Practical discipline here prevents false positives and saves hours of misguided optimization later.
Baseline cohort definition: Baseline cohort: All pageviews and interactions from the 30 days before url_tag=ai_generated deployment, excluding launches, major campaign days, and CMS migrations.
Treatment cohort: Treatment cohort: The 30 days after the AI-edited content went live, limited to the same content types and traffic sources as the baseline.
- Choose matching windows and filters.
- Ensure both periods use identical traffic filters (organic only, same UTM groups, same device mix).
- Normalize for external events.
- Remove days with known anomalies (product launches, heavy paid spend) or apply a day-of-week normalization factor.
- Minimum sample-size and statistical testing.
- Use a minimum of 1,000 sessions per cohort for behavioral metrics and 100 conversions per cohort for reliable conversion-rate comparisons.
- Run a two-sample t-test for continuous metrics like
Average Engaged Timeand a chi-squared or Fisher’s exact test for CTR and conversion counts. - Document and archive everything.
- Export raw GA4 reports and BigQuery extracts, snapshot the exact query SQL, and save CSVs for audits.
Key measurement items to extract and compare:
- Organic Sessions: volume stability and traffic mix.
- Average Engaged Time: median is often more robust than mean.
- CTR: impressions → clicks on listing pages and SERP features.
- Goal Conversions: micro and macro conversions tracked via GA4.
- Revenue per Visit: tie to e-commerce or LTV models where possible.
Provide a sample spreadsheet layout showing baseline vs treatment metrics and formulas
| Metric | Baseline (30 days avg) | Post-AI (30 days avg) | Absolute Change | Percent Change |
|---|---|---|---|---|
| Organic Sessions | 12,450 | 13,980 | 1,530 | 12.29% |
| Average Engaged Time (s) | 95 | 112 | 17 | 17.89% |
| CTR | 2.4% | 2.9% | 0.5ppt | 20.83% |
| Goal Conversions | 420 | 495 | 75 | 17.86% |
| Revenue per Visit ($) | 0.85 | 0.97 | 0.12 | 14.12% |
Key insight: This layout shows side-by-side averages with absolute and percent deltas so analysts can quickly spot direction and magnitude. Populate the sheet using GA4 exports or BigQuery, keep the raw CSVs, and add a results column with p-values from your statistical tests for auditability.
A disciplined baseline vs treatment process turns guesswork into evidence. Keep the cohorts tight, document every assumption, and keep raw exports—those files are the difference between defensible decisions and wishful thinking. If automating this pipeline is a priority, tools that connect GA4 → BigQuery → spreadsheets save repeat work and reduce human error; Scaleblogger.com can help embed that into an editorial workflow.
Analyze Quality: Human & Automated Evaluation
Start by treating quality as a measurable product: combine a repeatable manual rubric with automated signals, sample deliberately, and synthesize everything into a single dashboard that drives action. A mixed workflow catches what machines miss and scales what humans can’t—readability issues, factual drift, and gaps in semantic coverage become visible at a glance rather than lingering as vague “needs improvement” notes.
Team: At least one editor and one data owner responsible for pulling automated reports. Data access: CMS export, content IDs, and API keys for chosen tools. Baseline: A sample set of 50–200 posts to define current quality distribution.
Create a Quality Audit Workflow
1. Define manual rubric fields and scoring ranges.
1. Title & meta: 0–5 — clarity, intent match. Accuracy & sourcing: 0–10 — citation quality, primary sources. Comprehensiveness: 0–10 — topical depth vs. search intent. Readability & structure: 0–5 — headings, short paragraphs, Flesch Reading Ease. Originality: 0–5 — uniqueness, voice. Actionability/UX: 0–5 — next steps for reader, formatting.
1. Set pass/fail thresholds (example: ≥28/40 = publish-ready; 20–27 = needs revision).
2. Add automated checks.
- Readability (Flesch): run
Flesch Reading Easeand flag posts <50. - Semantic coverage: use embeddings to compare content vs. top-10 SERP vectors.
- Plagiarism: run a plagiarism API and flag >10% matched text.
- Fact-checking: run named-entity checks and verify claims against trusted data sources.
3. Design a sampling strategy for manual review.
- Stratified sample: pick posts across traffic deciles and content age.
- Risk-based sample: prioritize high-traffic, high-monetization, or recently-updated pages.
- Rotation cadence: audit 5–10% of active pages weekly; deep-audit 1% monthly.
4. Synthesize into a dashboard with weighted scores.
- Weighted score formula: combine rubric + automated signals (example weights: accuracy 30%, semantic 25%, readability 20%, originality 15%, UX 10%).
- Action buckets: Immediate publish, revise editorially, technical fix, archive.
- Visualization: distribution histograms, top failing fields, and time-to-fix trends.
Recommended quality-check tools, their core features, and best use-case
| Tool | Core feature | Best for | Cost tier |
|---|---|---|---|
| Readability API | Flesch and grade-level metrics via API | Automated readability checks | Freemium |
| Hemingway Editor | Sentence-level readability suggestions | Quick human edits | Free / Paid desktop |
| Grammarly | Grammar, clarity, plagiarism detection | Editorial polish + plagiarism flag | Paid (freemium) |
| Copyscape | Exact-match plagiarism scanning | Web plagiarism detection | Paid (per-search) |
| Turnitin | Academic plagiarism & citation checks | Research-heavy content | Enterprise / Paid |
| OpenAI embeddings | Semantic similarity / topical gap detection | SERP vector comparisons | Paid API |
| Cohere embeddings | Fast semantic vectors for clustering | Topic modeling at scale | Paid API |
| Full Fact / Fact-check APIs | Claim verification & source linking | Factual verification workflows | Free / Paid options |
| Factmata | Automated misinformation detection | Risk scoring for claims | Paid |
| Custom editorial QA spreadsheet | Manual rubric + status tracking | Editorial workflow and audit logs | Free (internal) |
Key insight: combine API-driven checks (readability, plagiarism, embeddings) with a concise manual rubric and a stratified sampling plan; the most efficient dashboards blend weighted automated signals with a small number of human-reviewed labels to calibrate models.
This workflow surfaces the specific problems blocking content performance and makes remediation predictable rather than guesswork. Implementing it quickly reduces rework, improves search visibility, and gives editors clear, prioritized worklists to act on.
Scale your content workflow with automation where it adds clear signal, and keep humans in the loop for nuance.
Reporting & Dashboards: Turn Metrics into Action
Build a dashboard that doesn’t just look pretty—it forces decisions. Focus on signals that tie content activity to business outcomes, then design visualizations and alerts so those signals trigger the right follow-up (optimize, pause, amplify). Start by picking a small set of high-impact widgets, match each to a visualization that reveals trends or anomalies at a glance, and create audience-tailored views so stakeholders see what matters to them.
Data access: Ensure GA4, BigQuery, Looker Studio, and internal CSV exports are available and mapped consistently.
Measurement plan: Define events, conversion types, and content taxonomy (content_type, model_version, published_date).
Core steps to build the dashboard
- Identify goals and metrics.
- Map each metric to a visualization and data source.
- Create alert rules and threshold logic.
- Build role-specific dashboard tabs (SEO, Content Ops, Executive).
- Iterate weekly based on actions taken and outcome changes.
- Widget-first mindset: Start with the action you want the viewer to take, then choose the metric.
- Iterate quickly: Ship a minimal view, collect feedback, then expand.
- Automation-ready: Use Looker Studio for reporting and BigQuery for aggregation so alerts can be programmatic.
What to include: core widgets, visuals, and alerts
Recommended dashboard widgets, recommended visualization types, and data sources
| Widget | Visualization | Data source | Why it matters |
|---|---|---|---|
| Traffic trend (AI vs non-AI) | Line chart with stacked series | GA4, BigQuery |
Shows growth or decline of AI-generated traffic vs other content |
| CTR by query | Bar chart with drilldown | GA4, internal CSV exports |
Reveals which queries the content wins and where meta needs work |
| Conversions by content_type | Funnel / stacked bar | BigQuery, GA4 |
Connects format (blog, guide, landing) to real business results |
| Quality score distribution | Histogram | internal CSV exports, BigQuery | Surface variance in editorial quality or engagement signals |
| Model_version performance | Small-multiples line charts | BigQuery, GA4 |
Compare outputs from different model versions to decide which to scale |
Key insight: These widgets tie content production decisions directly to traffic and conversion outcomes. Visualizing model_version side-by-side with quality and conversion helps decide whether an AI iteration should be rolled out or rolled back.
Alerts and thresholds
- Traffic drop: Alert when weekly traffic for a cohort drops >20% vs prior period.
- CTR slide: Alert when CTR for top 50 queries drops >15% and impressions are stable.
- Conversion falloff: Alert when conversion rate for a content_type declines >10% month-over-month.
Audience-tailored versions
- SEO view: Query-level CTR, rankings, impressions.
- Content Ops view: Quality scores, model_version performance, production backlog.
- Executive view: Revenue-attributed conversions, top trends, and 90-day forecast.
For teams scaling content with AI, integrating an automated pipeline that feeds into this dashboard saves hours and prevents guesswork—platforms like Scaleblogger.com can automate content scoring and publishing so the dashboard reflects production changes in near real time. The right dashboard turns metrics into the exact actions you want the team to take. Keep it focused, measurable, and connected to specific follow-ups so reporting becomes the trigger, not just a checkbox.
Iterate: Experiments, Optimization, and Governance
Start experiments quickly, fail fast, and make every run auditable. A pragmatic experiment practice separates hypothesis, measurement, and control; pairs each rollout with explicit decision rules; and treats model and prompt metadata as first-class traceability signals. Below are the essentials for designing repeatable, low-risk experiments that move content metrics forward.
Experiment design essentials
Hypothesis: One clear sentence tying an intervention to an outcome (e.g., Rewriting meta descriptions for long-tail pages will increase organic CTR by 10%). Primary metric: Choose one metric that moves the business (e.g., organic CTR, time-on-page, conversions). Secondary metrics: Track supporting signals (e.g., bounce rate, scroll depth) to detect negative side effects. Sample size guidance: Use power calculations or simple rules of thumb — aim for a minimum detectable effect of 5–10% with 80% power; for typical web traffic, start with at least 1,000 pageviews per variant or run until 14–28 days to capture seasonality. * Control group: Always compare against an unmodified control or historical baseline.
Step-by-step rollout process
- Define hypothesis, target segment, and one primary metric.
- Implement tracking and split (A/B or phased rollout) with experiment flags.
- Run the experiment for a pre-agreed duration or until reaching statistical thresholds.
- Analyze results, surface regressions, and validate against secondary metrics.
- Execute rollout or rollback according to decision rules.
Rollout decision rules and rollback triggers
- Decision rule: Deploy if the primary metric improves by the predefined threshold and no critical secondary metric regresses beyond a safe margin.
- Rollback triggers: Sudden drop in conversions, >5% negative change in revenue-related KPIs, or user-facing errors detected in logs.
- Phased rollout: Move from 5% → 25% → 100% exposure only after each gate passes monitoring checks.
Governance policies for high-risk content
- High-risk content: Content that touches legal, medical, financial, or safety advice must pass an approval workflow.
- Required signoffs: Legal or SME approval before public rollout.
- Monitoring cadence: Hourly checks for the first 24–72 hours after deployment, then daily for two weeks.
Traceability and logging
- Model metadata: Log
model_versionwith every generated asset. - Prompt metadata: Store the exact
prompt_template, variable values, and experiment ID. - Actionable logs: Capture timestamp, user/agent, content ID, and rollout flag to support audits and rollbacks.
Outline a simple experiment timeline with milestones, responsibilities, and decision gates (ai content experiment timeline)
| Milestone | Duration | Owner | Success criteria |
|---|---|---|---|
| Define hypothesis and metrics | 2 days | Content Strategist | Clear hypothesis + primary metric defined |
| Implement tracking and split | 3 days | Engineering / Analytics | A/B flag live; event tracking validated |
| Run experiment | 14 days | Product / Content | ≥1,000 views per variant or 14 days elapsed |
| Analyze results | 3 days | Analytics | Stat. significance or trend clarity; no regressions |
| Rollout or rollback | 1–3 days | Release Manager | Rollout gates passed or rollback executed |
Key insight: The timeline balances speed and safety — short setup, a two-week run to capture variance, and clear ownership for each gate so teams can act decisively without guesswork.
For teams ready to scale experiments, automating the tracking of model_version and prompt_template avoids handoffs and speeds audits. Pair that with gate-based rollouts and high-risk signoffs, and experimentation becomes both fast and defensible.
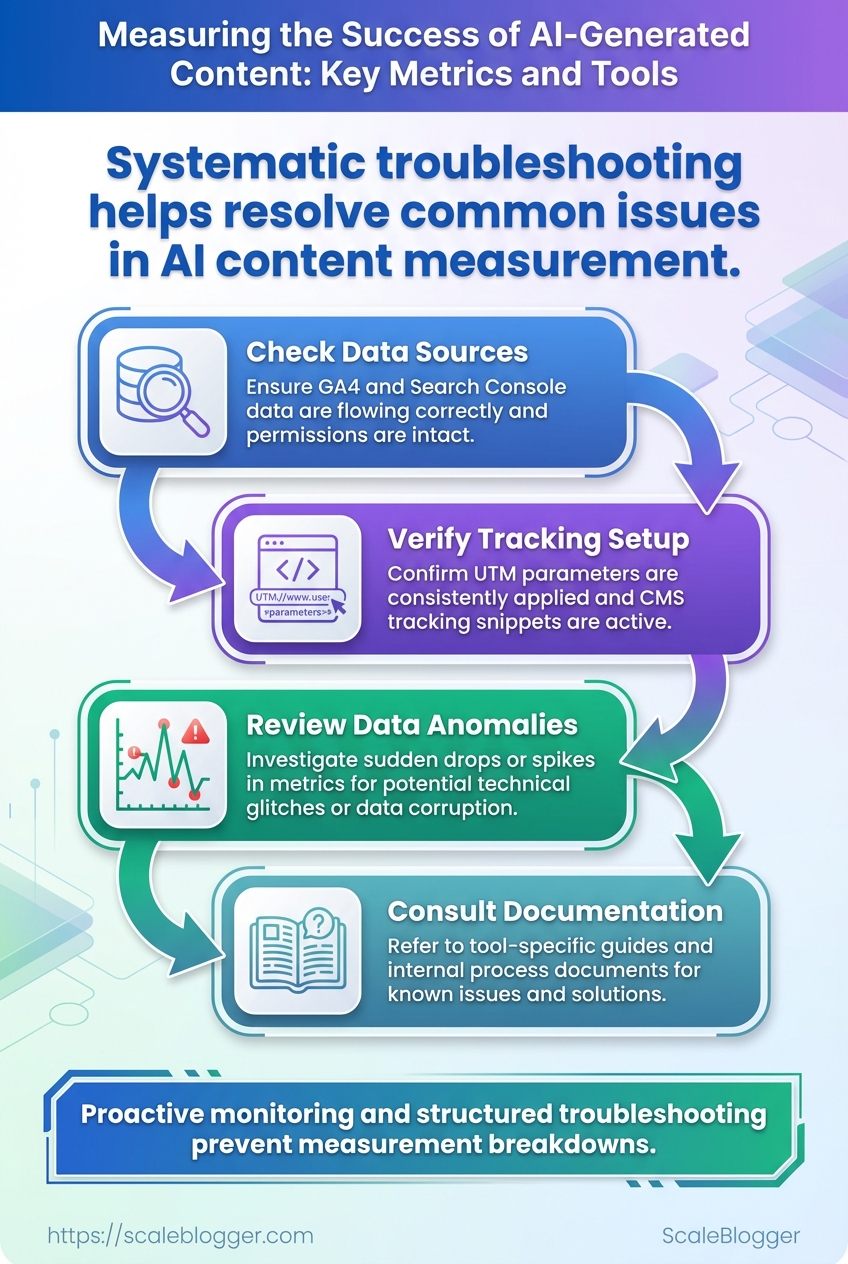
Troubleshooting Common Issues
Missing or incorrect tracking data usually comes down to three things: collection is broken, configuration is wrong, or post-processing filters are stripping values. Start by assuming the browser can’t reach the measurement layer, then work backward through Tag Manager, the dataLayer, and GA4 mappings. The process below gives a repeatable path that surfaces whether this is a tagging problem, a mapping bug, or a server-side gap that needs engineering support.
Access: Ensure you have Editor access to Google Tag Manager and Editor role for the GA4 property.
Tools: Browser dev tools, tag assistant/preview mode, access to CMS or CDN logs, optional BigQuery project for raw exports.
Quick checklist to run before deep-dive
- Confirm preview mode: Use GTM preview for immediate validation.
- Reproduce the event: Trigger the page/action while watching
dataLayer. - Compare timestamps: Cross-check event timestamps between GA4 and server logs.
Step-by-step process to fix missing or incorrect tracking data
- Open Google Tag Manager Preview and reproduce the issue in a fresh browser session.
- Inspect the
dataLayerfor the expected event keys and values; confirm custom dimensions are present aseventpayload fields. - In GTM, verify the tag fires and the trigger conditions match the actual
eventname and variables. - In GA4, check
DebugViewfor the incoming events and confirm parameter names match the property’s custom dimension mapping. - Validate GA4 settings: confirm no unwanted filters, confirm data retention settings, and check that the measurement ID used in GTM matches the GA4 property.
- If GA4 and CMS numbers still diverge, export debug logs or enable server-side tagging to capture raw hits for the suspect timeframe.
- Escalate by requesting BigQuery exports or server logs when client-side debugging shows correct payloads but GA4 lacks records.
Important definitions
dataLayer: The JavaScript array object that holds event payloads pushed from the page for GTM to read.
Custom dimension mapping: The GA4 property configuration that tells GA4 which event parameters become custom dimensions.
Common measurement issues, likely causes, and immediate fixes
Common measurement issues, likely causes, and immediate fixes
| Issue | Likely cause | Immediate fix | When to escalate |
|---|---|---|---|
| No ai_generated dimension data | Parameter not pushed or name mismatch (ai_generated vs aiGenerated) |
Fix dataLayer key naming and update GTM variable mapping |
If payloads show correct, but GA4 missing → request BigQuery export |
| Low sample size for new content | Sampling or incorrect event triggers | Use event_count debug + temporarily remove sampling settings |
Escalate if server logs show hits but GA4 sampling persists |
| Unexpected traffic drops | Measurement ID changed, tag blocked by adblockers, or filters applied | Verify measurement ID; test in incognito; check property filters | If sudden persistent drop, request CDN/server logs |
| Mismatch between GA4 and CMS reports | Timezone, attribution model, or missing server-side conversions | Align timezone/attribution, add server-side tracking for conversions | Escalate with BigQuery exports to reconcile raw events |
| False positives from scraping | Bots scraping content triggering events | Add bot filtering, require authenticated event tokens | If scale of scraping large, get server logs and implement rate-limits |
Key insight: the majority of tracking gaps are naming mismatches, trigger misconfigurations, or client-side blockers; server-side exports (BigQuery/server logs) are the reliable escalation path when client-side checks look correct.
When the fix requires engineering, hand over a concise packet: reproducer steps, a dataLayer dump (JSON), GTM preview screenshots, and the exact timestamps to pull from server logs or BigQuery. For teams looking to automate these checks, consider integrating validation into the CI pipeline or using an AI content analytics platform to flag tracking regressions; tools like Scaleblogger.com can help automate content-to-metric mappings and surface anomalies faster.
Catching tracking issues early saves hours of hunting and keeps content performance signals trustworthy for optimization decisions.
📥 Download: AI-Generated Content Success Measurement Checklist (PDF)
Tips for Success & Pro Tips
Start by treating the content pipeline like any other product: instrument it, monitor it, and iterate fast. Small instrumentation choices saved more time than big strategy pivots in projects I’ve seen—labeling, cost-tracking, and automated snapshots amplify learning velocity and keep budgets honest.
content_type: Short descriptor used in the inventory (e.g., how-to, long-form, newsletter).
ai_generated: Boolean flag indicating whether the draft came from an LLM or human.
Practical, high-impact moves to put in place right away:
- Label everything: Add
content_typeandai_generatedfields to the CMS metadata so filtering and queries are trivial. - Track model metadata: Capture
model_name,model_version,prompt_id, andtemperatureper draft for traceability and A/B analysis. - Add cost fields: Track
ai_token_cost,editor_hours, andother_production_coststo computecost_per_article. - Automate weekly exports: Schedule automated snapshot CSVs and email alerts for anomalies (spike in token spend, drop in traffic).
- Alert on drift: Set alerts for sudden changes in engagement or token usage so model/prompt issues are caught fast.
Step-by-step: implement basic tracking in under a week
- Add the new metadata fields to the content inventory schema and deploy a migration.
- Wire the content editor to auto-fill
ai_generatedand prompt fields when an LLM is used. - Connect billing APIs to a small ETL that attaches
ai_token_costto each published item. - Schedule a weekly snapshot export and create an alert rule for >30% week-over-week token variance.
Real examples that work
- Capture
prompt_idas a foreign key to a prompt library so you can see which prompts produce the best engagement. - Use editor time estimates (rounded to nearest 0.5 hour) rather than trying to log down-to-the-minute labor.
- Run a monthly cost-per-conversion review: tie CRM conversions to content URLs and divide revenue attributed by aggregated production cost.
Suggested cost-tracking fields to add to content inventory to understand efficiency
| Cost item | How to measure | Example value | Why it matters |
|---|---|---|---|
| AI token cost | From API billing per request aggregated by content ID | $3.50/article | Shows direct model spend per piece |
| Editor time (hours) | Timesheet or editor estimate | 1.5 hours | Human labor dominates small-scale production cost |
| Total production cost | Sum of token cost + editor cost + tooling | $28.00/article | True marginal cost to compare vs. ROI |
| Revenue / conversions attributed | CRM attribution by landing page or UTM | $120/article | Measures economic value and ROI |
Key insight: tracking token costs alongside editor hours quickly exposes where automation saves money vs. where human craft still drives ROI. When total production cost is visible, decisions about model upgrades, prompt tuning, or extra editing become financial choices, not guesses.
A final nudge: instrument the pipeline before optimizing it—record the basics, run a few experiments, then use the data to scale confidently. If tightening cost-per-article is the goal, that single metric plus attribution will guide every practical trade-off.
Appendix: Recommended Tools & Integrations
Start with a simple truth: a reliable measurement stack plus a few quality content and ML tools gets most teams 80% of the way toward repeatable content wins. The priority stack here is built for tracking content performance end-to-end, validating quality, running experiments, and keeping models auditable.
Quick comparison of recommended tools and their core integrations
| Tool | Primary use | Key integration | Notes |
|---|---|---|---|
| Google Analytics 4 | Web + app behavioral analytics | BigQuery native export; Looker Studio visualizations | Free tier; event-driven model; use for traffic, engagement, conversion funnels |
| BigQuery | Enterprise data warehouse | GA4 export; Looker Studio for BI; connects to ETL tools | Pay-as-you-go pricing; stores raw events for custom attribution and lifetime value |
| Looker Studio | Dashboarding & reporting | Native connectors to GA4, BigQuery, Google Sheets | Free; flexible reporting; good for executive and editorial dashboards |
| Plagiarism checker | Content originality validation | CMS plugins, API integrations (WordPress, editorial tools) | Options: Copyscape, Turnitin, Grammarly; pricing varies; important for brand safety |
| Semantic analysis tool | Topical coverage and NLP-based scores | CMS/editor plugins, API, SEO platforms | Options: SurferSEO, Clearscope, or custom spaCy pipelines; helps surface missing subtopics |
Industry analysis shows this combination covers measurement, storage, visualization, quality, and topical relevance without overbuilding.
GA4 + BigQuery export: Enable BigQuery export in your GA4 property and confirm dataset permissions.
Looker Studio: Connect Looker Studio to both GA4 and the BigQuery dataset.
Step-by-step quick setup
- Enable GA4 on your site and configure event tracking for key content events (page_view, scroll, conversion).
- Turn on BigQuery export from GA4 and set a daily dataset retention policy.
- Build a Looker Studio report pulling GA4 and BigQuery for both real-time and historical views.
- Add a plagiarism checker to editorial workflow (pre-publish) and run semantic analysis to score coverage.
- Instrument experimentation: use client-side A/B or server-side holdouts and log variant IDs to GA4/BigQuery.
- Add model auditing: log
model_versionandprompt_metadatawith each generation event into BigQuery for traceability.
Operational tips
- Use
model_version: store this field with each content record to trace outputs back to a model snapshot. - Log
prompt_metadata: include prompt templates and variable values for reproducibility. - Readability checks: add an automated readability pass in the editor before publish.
For teams ready to automate further, Scaleblogger.com integrates AI content pipelines with scheduling and performance benchmarking, making the stack easier to operationalize. Try building the stack iteratively—start with GA4 → BigQuery → Looker Studio, then add quality and model monitoring as the next light-weight steps. This order keeps effort low while unlocking measurable improvements quickly.
Conclusion
This article leaves one practical thread: getting AI content out of the draft folder isn’t the win — proving it performs is. Focus first on clear KPIs, solid instrumentation, and a baseline so experiments mean something. Teams that measured pre-AI vs. post-AI performance discovered where traffic growth failed to turn into conversions, and those same teams fixed funnel leaks by pairing automated quality checks with short human reviews. Tracking the right mix of engagement, conversion, and qualitative signals makes analytics tools actually useful instead of just noisy dashboards.
Next steps are straightforward: define 3–5 measurable goals, instrument those events in your analytics, and run short A/B tests while scoring drafts for quality. For teams looking to automate this workflow and scale reliable content success measurement, platforms like Automate AI content measurement with Scaleblogger can streamline tagging, reporting, and iterative experiments so insights turn into actions faster. If questions linger about which metrics to prioritize or which analytics tools to adopt, start with conversion events tied to your primary revenue action and iterate from there — evidence suggests small, frequent experiments beat one-off overhauls.
